يتم التشغيل بواسطة Blogger.

آخر الحلقات عن الفيسبوك

آخر حلقات الويندوز

الاقسام

آخر الحلقات الحصرية

صوت وصورة

أخبار المشاهير

توقيت المغرب

رياضة عالمية

Main Post

أرشيف المدونة الإلكترونية

آخر الحلقات عن الانترنت

آخر حلقات الحماية من الهاكرز

أقسام

Send Quick Massage

الاسم

بريد إلكتروني *

رسالة *

إشترك بالمدونة

الكتاب الرسميون

الدولي

آخر الحلقات عن منتجات جوجل

المشاركات الشائعة

عن الموقع

my

Visitors

الثلاثاء، 29 يونيو 2010

Installing Ubuntu

Now that you have the Desktop CD, you'll need to reboot your computer to use Ubuntu.
Your computer's BIOS must be set to boot from CD first; otherwise, Windows will just load up again. To get into the BIOS settings, you usually have to press one of these keys during boot-up: Escape, F1, F2, F12, or Delete. Usually your computer will tell you which key to use.

Once your BIOS is configured to boot from CD first, if you have Ubuntu in the drive, you should see this screen. Ubuntu will take a couple of minutes to load up. Just be patient.

Select your preferred language.
If you have at least 512 MB of RAM, you may want to select Try Ubuntu, as it will allow you to do other things (check your email, browse the web) while you're installing Ubuntu.
If you have only 256 MB or 384 MB of RAM, you should select Install Ubuntu. This will give you the same installation screens you see below, but you won't have the rest of the Ubuntu live session running as well.
If you have less than 256 MB of RAM, you should use the Alternate CD to install Ubuntu, or do a barebones installation.

If you choose to install Ubuntu directly, the installer will launch immediately. If you choose the Try Ubuntu option, you'll be in the Ubuntu live session. From there, click the Install Ubuntu icon on the desktop.

Answer the questions as best you can. Most of them should be self-explanatory.

By default, the installer will give you the option to install Ubuntu side by side with whatever operating system is currently on your computer. You can choose that if you want to set up a dual-boot, but as I stated before, the safest dual-boot is probably with Wubi, unless you know what you're doing (in which case you shouldn't be looking at this guide).

For simplicity's sake, you should select Use the entire disk. Or, if you don't want to erase your entire drive, click Quit and then boot back into Windows and set up a dual-boot using Wubi.

The next screen will ask you for your username and password. On some smaller screens, you may have to scroll down to see some of the other options.
Once you're sure you want to do this (this will erase your entire hard drive—make sure everything is backed up first!), click Install.

If you booted Try Ubuntu, you can still keep using the live CD to play games or surf the web while Ubuntu is installing. There is also a slideshow you can watch.

More slideshow.

Still more slideshow.

Yeah.

That's right.

Eventually, the installation will finish (the whole thing can take anywhere between 15 minutes and an hour, depending on the speed of your computer). You can either Continue Testing if you want to shutdown your computer or Restart Now if you want to restart your computer.

Either way, Ubuntu will eject your CD (or prompt you for when to remove your USB stick, if you used UNetBootIn instead of a CD burning program). The next time you boot up, you should have a working Ubuntu installation!

الاثنين، 28 يونيو 2010

Desktop phishing

TH3 Professional Security

TH3-pro.blogspot.com


By Mr Raghib Amine


PHISHING : DESKTOP PHISHING
Summary

1- Disclaimer

2 - Phishing ?

3-What is desktop phishing ?

4- How it's work ?

5- What is Hostfile in windows ?

6-Example

7 -How can this attack can be allocatable ?

8- Credit

Disclamer


What is THe Professional security or TH3-pro.blogspot.Com?

TH3-pro.blogspot.Com is definitely not a site that promotes or encourages computer hacking (unethical), but rather it is a Computer Security related website. In fact, Computer Hacking and Computer Security are the two concepts that goes hand-in-hand. They are like the two faces of the same coin. So with the existence of close proximity between Hacking and Security, it is more likely that people often mistake our site to be one that promotes Hacking. But in reality, our goal is to prevent hacking. We believe that unless you know how to hack (ethically), you cannot defend yourself from malicious hack attacks. Know Hacking but No Hacking!

Your usage of this website constitutes your agreement to the following terms.
1. All the information provided on this site are for educational purposes only. The site is no way responsible for any misuse of the information.

2. “ TH3 professional security” is just a term that represents the name of the site and is not a site that provides any illegal information. TH3-pro.blogspot.Com is a site related to Computer Security and not a site that promotes hacking/cracking/software piracy.

3. This site is totally meant for providing information on “Computer Security” “Computer Programming” and other related topics and is no way related towards the terms “CRACKING” or “HACKING” (Unethical).

4. Few articles (posts) on this site may contain the information related to “Hacking Passwords” or “Hacking Email Accounts” (Or Similar terms). These are not the GUIDES of Hacking. They only provide information about the legal ways of retrieving the passwords. You shall not misuse the information to gain unauthorised access. However you may try out these hacks on your own computer at your own risk. Performing hack attempts (without permission) on computers that you do not own is illegal.

5. The virus creation section on this site provides demonstration on coding simple viruses using high level programming languages. These viruses are simple ones and cause no serious damage to the computer. However we strongly insist that these information shall only be used to expand programming knowledge and not for causing malicious attacks.

6. All the information on this site are meant for developing Hacker Defense attitude among the users and help preventing the hack attacks. Gohacking.Com insists that these information shall not be used for causing any kind of damage directly or indirectly. However you may try these codes on your own computer at your own risk.

7. The word “Hack” or “Hacking” that is used on this site shall be regarded as “Ethical Hack” or “Ethical Hacking” respectively.

8. We believe only in White Hat Hacking. On the other hand we condemn Black Hat Hacking.

8. Most of the information provided on this site are simple computer tricks (may be called by the name hacks) and are no way related to the term hacking.

9. Some of the tricks provided by us may no longer work due to fixture in the bugs that enabled the exploits. We are not responsible for any direct or indirect damage caused due to the usage of the hacks provided on this site.

10. The site holds no reponsiblity for the contents found in user comments and forum since we do not monitor them. However we may remove any sensitive information present in the user comments or on the forum upon request.

11. We reserve the right to modify the Disclaimer at any time without notice.
This documentation is joined with a video you can found it in youtube channel youtube/oxiiiiid or our tv
TH3.blip.tv
2 What Is Phishing ?

In the field of computer security, phishing is the criminally fraudulent process of attempting to acquire sensitive information such as usernames, passwords and credit card details by masquerading as a trustworthy entity in an electronic communication. Communications purporting to be from popular social web sites, auction sites, online payment processors or IT administrators are commonly used to lure the unsuspecting public. Phishing is typically carried out by e-mail or instant messaging,[1] and it often
directs users to enter details at a fake website whose look and feel are almost identical to the legitimate one. Even when using server authentication, it may require tremendous skill to detect that the website is fake. Phishing is an example of social engineering techniques used to fool users,[2] and exploits the poor usability of current web security technologies.[3] Attempts to deal with the growing number of reported phishing incidents include legislation, user training, public awareness, and technical security measures.
A phishing technique was described in detail in 1987, and the first recorded use of the term "phishing" was made in 1996. The term is a variant of fishing,[4] probably influenced by phreaking,[5][6] and alludes to baits used to "catch" financial information and passwords. Wikipidia


1) what is desktop phishing ?


Salamo Alaykoum . Desktop Phishing is one more method of Phishing useful to hack email account passwords. Not only email passwords, but you can hack any account password of site you want. Attacker has to send phisher to victim to his in box and you have to wait for victim to login with out sent Phisher.

But, in Desktop Phishing, you only have to send the Phisher Arm (If it's phisher in phishing, we call it phisher arm in Desktop Phishing). You have to run server on your computer and save fake page of the website you wanna hack password, in directory of this server.

2) how it's work ?


Like you see in diagram pic in desktop phishing the victim are not directly linked to the fake page but is redirected to the fake page by using something called hostfile in windows

3)What is Hostfile in windows ?


The hosts file is a computer file used in an operating system to map hostnames to IP addresses. This method is one of several system facilities to address network nodes on a computer network. On some operating systems, the host file content is used preferentially over other methods, such as the Domain Name System (DNS), but many systems implement name service switches to provide customization. Unlike DNS, the hosts file is under the control of the local computer's administrator (wiki)

the attacker with some way like we will see in this tutorial can change the host file by changing or adding a wrong Dns value DNS linked to a web site by an other related to the fake page

4)How ? (example)

take of Example that the Ip address of www.paypal.com is 88.55.266.4
and the attacker has a server with a fake page of paypal uploaded in and the ip address of server is 255.56.77.89 so the attacker will add

www.paypal.com 255.56.77.89

then the victim when he will put http://www.paypal.com the address bar normally the browser will look for the ip address of this by looking first in hostfile in windows will not redirect to 88.55.266.4 but it will redirect to the attacker server 255.56.77.89
more than that the address will not change I mean that www.paypal.com it will stay and it will not change also the victim will not pay attention that he is on a fake website or a page
From here you will understand the danger of hostfile in windows

5) How can this attack can be allocatable ?

Simply you can use a large script that can aplicate this attack for me or like you see in video I use a fake program that I prompte to user to click to see the webcam of camera by clicking the program will put some fake ip address related to some fake servers that I have

VB script Code:


Open "c:\windows\system32\drivers\etc\hosts" For Output As #1

Print #1, "127.0.0.1 localhost"

Print #1, "127.0.0.1 th3-pro.blogspot.com"

Close #1


TH3- END

Credit

TH3 professional security TM
copyright 2010©

Raghib Amine
BlOG : TH3-pro.blogspot.com
YOUTBE : Youtube.com/oxiiiiid
FACEBOOK:facebook.com/TH3.prof
TV: TH3.blip.TV


Download documentation from
http://www.ziddu.com/download/10481575/dekstopphishing.doc.html


see or video also in

from

http://blip.tv/file/3812654


الأحد، 27 يونيو 2010

Work In internet out from home

you looking to make some money you have some free time and you wanna profite of it to work out from your home ,odesk company can realise your dream and be true no more fake web sites no blabla watch out Episode to know more how it's work

maded by rahgib amine


link to video


link of odesk website


happy watching
:)


How to identify Open Ports in ubuntu with nmap

http://www.quantrimang.com.vn/download/data/Image/Khac/102009/1910_ubuntu-penguin_450.jpg
Nmap is a utility for network exploration or security auditing. It supports ping scanning (determine which hosts are up), many port scanning techniques, version detection (determine service protocols and application versions listening behind ports), and TCP/IP fingerprinting (remote host OS or device identification).
Nmap also offers flexible target and port specification, decoy/stealth scanning, sunRPC scanning, and more. Most Unix and Windows platforms are supported in both GUI and commandline modes. Several popular handheld devices are also supported, including the Sharp Zaurus and the iPAQ.
Install nmap in ubuntu
sudo apt-get install nmap
Nmap examples
Here are some Nmap usage examples, from the simple and routine to a little more complex and esoteric. Some actual IP addresses and domain names are used to make things more concrete. In their place you should substitute addresses/names from your own network.. While I don’t think port scanning other networks is or should be illegal, some network administrators don’t appreciate unsolicited scanning of their networks and may complain. Getting permission first is the best approach.
For testing purposes, you have permission to scan the host scanme.nmap.org. This permission only includes scanning via Nmap and not testing exploits or denial of service attacks. To conserve bandwidth, please do not initiate more than a dozen scans against that host per day. If this free scanning target service is abused, it will be taken down and Nmap will report Failed to resolve given hostname/IP: scanme.nmap.org. These permissions also apply to the hosts scanme2.nmap.org, scanme3.nmap.org, and so on, though those hosts do not currently exist.
nmap -v scanme.nmap.org
This option scans all reserved TCP ports on the machine scanme.nmap.org . The -v option enables verbose mode.
nmap -sS -O scanme.nmap.org/24
Launches a stealth SYN scan against each machine that is up out of the 256 IPs on “class C” sized network where Scanme resides. It also tries to determine what operating system is running on each host that is up and running. This requires root privileges because of the SYN scan and OS detection.
nmap -sV -p 22,53,110,143,4564 198.116.0-255.1-127
Launches host enumeration and a TCP scan at the first half of each of the 255 possible eight-bit subnets in the 198.116 class B address space. This tests whether the systems run SSH, DNS, POP3, or IMAP on their standard ports, or anything on port 4564. For any of these ports found open, version detection is used to determine what application is running.
nmap -v -iR 100000 -Pn -p 80
Asks Nmap to choose 100,000 hosts at random and scan them for web servers (port 80). Host enumeration is disabled with -Pn since first sending a couple probes to determine whether a host is up is wasteful when you are only probing one port on each target host anyway.

sniff paswords using wireshark

http://www.mixis.fr/images/wireshark.jpg

TH3 Professional security
TH3-pro.blogspot.com

by Mr Raghib Amine


sniffing : wireshark

About This Documentation
This documentation is joined with a video you can found it in youtube channel youtube/oxiiiiid or our tv
TH3.blip.tv


Phase 1 Download wireshark From


Or In debian

sudo apt-get install wireshark

Phase 2 Run wireshark

In Linux (debian)

sudo wireshark

In Windows double Click In wireshark icone

Phase 2 configure

just chose your interface (eth0) by double and click


phase 3 How To sniff

to start sniffing Http Protocol just type in filter (http) and white to someone connect on his/here account and you will see his/here passwords it may be can crypt ed so you need a md5 cracker to crack his/here password


TH3- END

E-mail : redhat@hotmail.fr


download the documontation
click here


See the video from youtube *


click here 

video in arabic language 


الجمعة، 25 يونيو 2010

Znmap

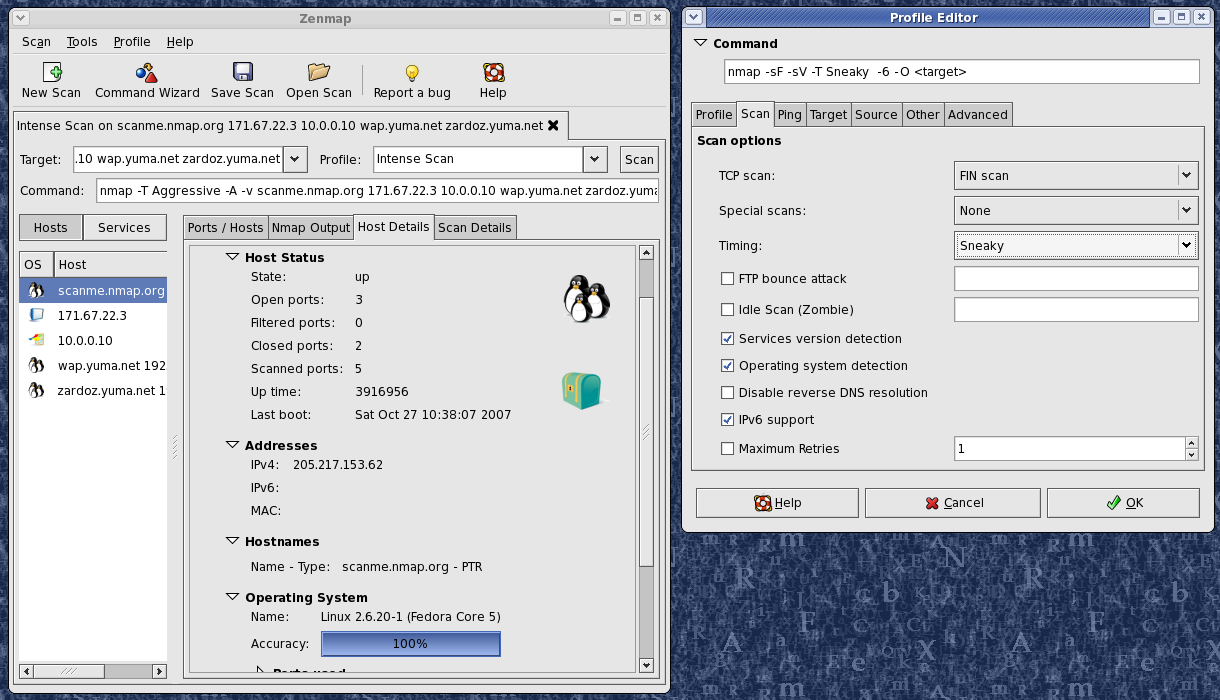
http://nmap.org/zenmap/images/zenmap-multi-1220x700.png
Nmap and Zenmap (the graphical front end) are available in several versions and formats. Recent source releases and binary packages are described below. Older version (and sometimes newer test releases) are available from the dist directory (and really old ones are in dist-old). For the more security-paranoid (smart) users, GPG detached signatures and SHA-1 hashes for each release are available in the sigs directory (verification instructions). Before downloading, be sure to read the relevant sections for your platform from the Nmap Install Guide. The most important changes (features, bugfixes, etc) in each Nmap version are described in the Changelog. Using Nmap is covered in the Reference Guide, and don't forget to read the other available documentation, particularly the new book Nmap Network Scanning!

الاثنين، 21 يونيو 2010

Grml

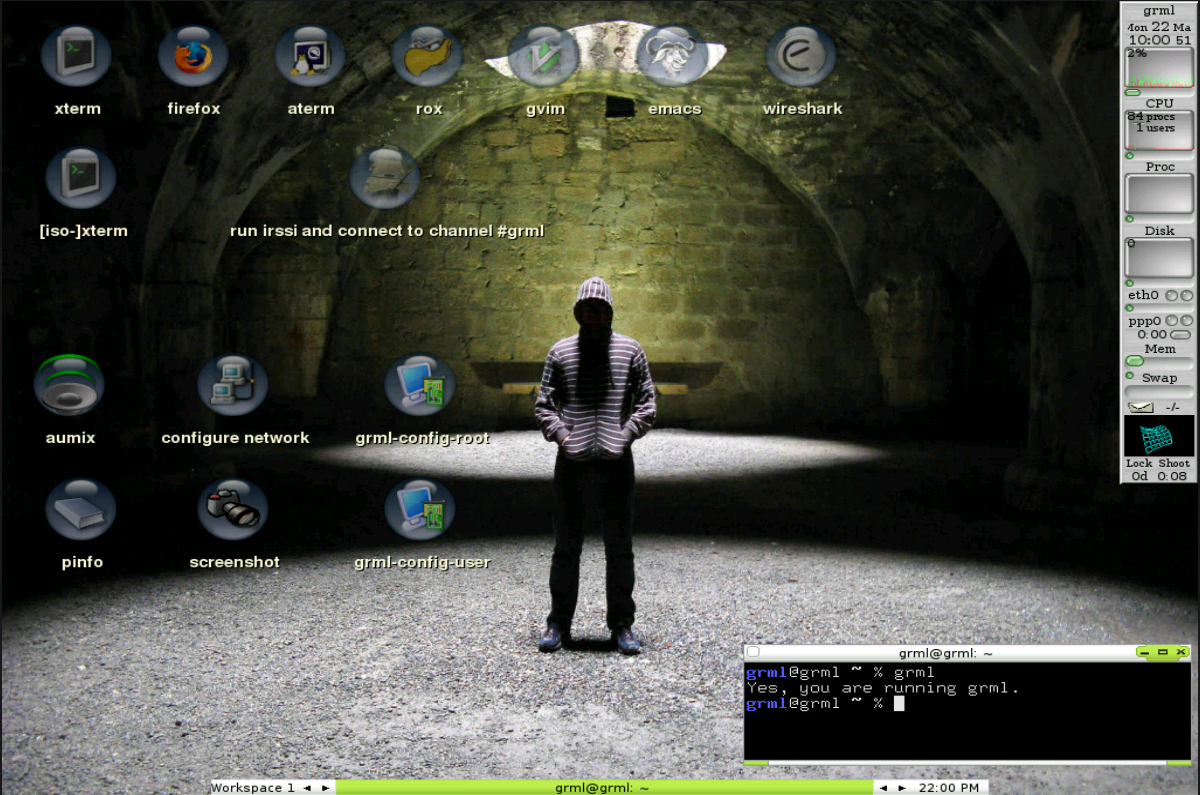
grml_2010.04.png
Grml is a bootable live system (Live-CD) based on Debian. Grml includes a collection of GNU/Linux software especially for system administrators and users of texttools. Grml provides automatic hardware detection. You can use Grml (for example) as a rescue system, for analyzing systems/networks or as a working environment. One of the main features of the grml system is the zsh (Z shell). The zsh is the default interactive shell of the grml system. The kernel 2.6 provided by the grml system is based on the latest stable(!) vanilla kernel (taken from kernel.org) we consider 'useful and working'. The grml-kernel includes several patches and modules. A little modified version of live Grml is Grml-Forensic.

Details

  • Discussion Forum  :


Fiddler

http://www.fiddler2.com/Fiddler/images/FiddlerLogo.png

What is Fiddler?

Fiddler is a Web Debugging Proxy which logs all HTTP(S) traffic between your computer and the Internet. Fiddler allows you to inspect all HTTP(S) traffic, set breakpoints, and "fiddle" with incoming or outgoing data. Fiddler includes a powerful event-based scripting subsystem, and can be extended using any .NET
language.
Fiddler is freeware and can debug traffic from virtually any application, including Internet Explorer, Mozilla Firefox, Opera, and thousands more.

الأحد، 20 يونيو 2010

cryptmount

crypt-img.png


cryptmount is a utility for GNU/Linux operating systems which allows an ordinary user to mount an encrypted filing system without requiring superuser privileges. It is aimed at recent Linux systems using the 2.6 kernel series. cryptmount was written to make it as easy for ordinary users to access encrypted filesystems on-demand using the newer devmapper mechansism as it was to use the older, now deprecated, cryptoloop methods. This offers the following advantages:

Details

  • Discussion Forum :
  • Mailing List :
  • Platforms : Linux
  • License : GNU GPL
  • Author : rwpenney
  • Contact Email : rwpenney@users.sourceforge.net


Padding Oracle Exploit Tool (POET)

poetsc01.png 


Padding Oracle Exploit Tool (POET) demonstrates a powerful side-channel attack known as the padding oracle attack. 


  • Discussion Forum  :
  • Mailing List  :
  • Platforms  : Windows, Linux, Mac OSX
  • License  : GNU GPL
  • Author  :
  • Contact Email  : info@netifera.com


ArpON


ArpON (Arp handler inspectiON) is a portable handler daemon that make Arp secure in order to avoid Arp Spoofing/Poisoning & co. This is possible using two kinds of anti Arp Poisoning tecniques, the first is based on SARPI or "Static Arp Inspection", the second on DARPI or "Dynamic Arp Inspection" approach. Keep in mind other common tools fighting ARP poisoning usually limit their activity only to point out the problem instead of blocking it, ArpON does it using SARPI and DARPI policies. Finally you can use ArpON to pentest some switched/hubbed LAN with/without DHCP protocol, in fact you can disable the daemon in order to use the tools to pson the ARP Cache. Features: - It replaces Arpwatch & co; ArpON blocks; - It detects and blocks Arp Poisoning/Spoofing attacks in statically configured networks; - It detects and blocks Arp Poisoning/Spoofing attacks in dinamically configured (DHCP) networks; - It detects and blocks unidirectional and bidirectional attacks; - It manages the network interface into unplug, boot, hibernation and suspension OS features; - Easily configurable via command line switches, provided that you have root permissions; - It works in userspace for OS portability reasons; - Tested against Ettercap, Cain & Abel, dsniff and other tools.
download

Download:All versions of AVG Anti-Virus and Internet Security keygen


This keygen includes many keygens for the latest AVG Softwares and abousolutely contains no spyware,virus,etc.I have already scanned it with the latest version of Avira and reported 0 threats !Here is a virustotal.com report only 3 out 39 antiviruses and it's a false positive
http://www.virustotal.com/analisis/69dc5c560787ed47800b4d998daf3b59

Also scanned with Avira,Norton and Adware Pro as well but if you think otherwise let me know

This pack contains the following keygens :

AVG Internet Security Network Edition
AVG Internet Security 3-pack
AVG Internet Security SBS
AVG Anti-Virus plus Firewall
AVG Email Server Edition
AVG File Server Edition
AVG Anti-Virus
AVG Free
AVG Anti-Virus SBS Edition


Download:AVG Keygen

Activate Windows 7 with Windows 7 Ultimate Keygen

Activate Windows 7 with Windows 7 Ultimate Keygen

Windows Seven is slowly becoming a bigger success thn Windows Vista .So here we have it now !

Click Generate and it will Generate and copy the serial to the clipboard for
you. All the keys have been put together from MS in a randomized
order.

The generated keys are working for 32 and 64bits and also on
Beta and RC builds.. Even the latest one, 7127

Download Windows 7 Ultimate Keygen

الجمعة، 18 يونيو 2010

[TUT] Verify a Paypal in ANY Country!!!


I see a lot of People on the Forum asking "How can I Verify my UK Paypal? Not an American", so today I will answer those problems with this Simple Technique.

This will involve setting up an American Paypal though, but thats part of the Verification.

Step 1:

Visit this Thread and make a Verified Paypal Account: (No Credits go to me for this part of the Tut)

http://www.sythe.org/showthread.php?t=638933

Step 2:

Go to your Profile, then go to Currencies:

[Image: paypaltut.png]

Step 3:

Select GBP, then follow the Numbers 1,2,3,4,5 in order:

[Image: paypaltut2.png]

You now have a Verified UK Paypal Account!! Victoire

Hope you liked the TUT, please do not redistribute Oui

Tutorial On Getting Free .com/.net/.org.. Domain With Hosting


STEP 1:
We need to install mozilla firefox ... if u dont have it download it here:
http://www.mozilla.com/en-US/products/download.html

Then we need proxy, german proxy u can find some german proxys here:
http://www.xroxy.com/proxylist.php?port=...ity=#table
when u got a proxy test it here:
http://ip-adress.com
if it shows your location then the proxy wasnt valid if it http://www.mozilla.com/en-US/products/do....htmlshows a location on germany it is a valid proxy.


STEP 2:
Go here
Domain registrieren :: http://www.domain24.de/

Then type the domain you want and press suchen - Like in screen shoot!

[Image: 55183955.jpg]

STEP 3:
Then u get a list of the domain u choose, chek any domain u want but not the domain that says VERGEBEN, cause that means
that it is taken, and then press The button .... - Like in screen shoot!

[Image: 11523727.jpg]


Then click "Melden sie sich hier an" - Like in screen shoot!

[Image: 18152449.jpg]

STEP 5:
Then it asks for name, surname, adress,phone number .... type everything fake ... u can do it like in image but at the phone number type this
030- ( 7numbers what u want), and the email... type your gmail account! and press WEITER! - Like in screen shoot!

[Image: 43232390.jpg]

STEP 6:
Now you need to type a BLZ konto .. go here
http://bing.com and search for this :
"blz konto postbank germany 2009" without ""
When u find one it should look like this

[Image: 77693319.jpg]

Then type it in that format here and then press WEITER - Like in screen shoot!

[Image: 48151439.jpg]

STEP 7:
Now accept the TOS and press Anmelden! Now wait about 24h until the domain is active:D - Like in screen shoot!

[Image: 81519776.jpg]

STEP 8:
Login to your gmail account and chek your imbox for a message, if u got a message it should look like this! - Like in screen shoot.

[Image: 30478511.jpg]

If yes you got your account login details ! Login with your email and the password that they send to you.

STEP 9:
Now we are going to buy hosting :D if u see your domain there press WEBSPACE ...follow the image.
First do this

[Image: 99567336.jpg]

Then press DOMAINS like this


[Image: 83666680.jpg]

Then chek if it is activated .... if it shows you this,

Thread continued below(maximum Picture limit)

[Image: 99390962.jpg]

then your domain isnt activated yet wait 24h from the registration :D
but if it shows you this

[Image: 25806114.jpg]

then your domain is activated ... press then WEBSPACE ... like in that pic!

STEP 10:
Then u see some thing like this ...

[Image: 45666732.jpg]

Pres the last one ... the 5th press the button down!

Almost done :D lol

STEP 11:
After u did that u are going to recviev about 3 or 4 mails ... i can be after 1 hour .... dont know ... but you are going to recvieve something:D
Search for a mail named
Domain 24 - Webspace bestellung
that looks like this!

[Image: 64435254.jpg]

STEP 12:
http://www.ispcp.adminfrontend.de/
Default PLESK Page
And login:
The username should be the domain that u bought
The password is your account password that u got in the first mail:D

STEP 13:
Then when you are loged in press on the TOP menu press an icon that says:
"FTP zugange"
And then on the menu in the left side press:
"FTP-zugang anlegen" - Like in screen shoot!

[Image: 97825691.jpg]

LAST STEP - STEP 14:
Create your ftp account
First write the username you want ...
Then twice the password and press
"Anlegen"

[Image: 79092584.jpg]

Your username is going to be
username@yourdomain.com or .net ... or what u choosed:D

--
Congrats now wait about 6 hours, untill the FTP account is activated :D
Chek it with your FTP CLIENT every hour if it is avtivated, if it is activated you are going to see about 4 or 5 folders:D
Dont delete them, you should upload your files at the folder named
HTDOCS or something like this...
by Mr electroman 
TH3-pro.blogspot.com

التصنيفات


Installing Ubuntu

Now that you have the Desktop CD, you'll need to reboot your computer to use Ubuntu.
Your computer's BIOS must be set to boot from CD first; otherwise, Windows will just load up again. To get into the BIOS settings, you usually have to press one of these keys during boot-up: Escape, F1, F2, F12, or Delete. Usually your computer will tell you which key to use.

Once your BIOS is configured to boot from CD first, if you have Ubuntu in the drive, you should see this screen. Ubuntu will take a couple of minutes to load up. Just be patient.

Select your preferred language.
If you have at least 512 MB of RAM, you may want to select Try Ubuntu, as it will allow you to do other things (check your email, browse the web) while you're installing Ubuntu.
If you have only 256 MB or 384 MB of RAM, you should select Install Ubuntu. This will give you the same installation screens you see below, but you won't have the rest of the Ubuntu live session running as well.
If you have less than 256 MB of RAM, you should use the Alternate CD to install Ubuntu, or do a barebones installation.

If you choose to install Ubuntu directly, the installer will launch immediately. If you choose the Try Ubuntu option, you'll be in the Ubuntu live session. From there, click the Install Ubuntu icon on the desktop.

Answer the questions as best you can. Most of them should be self-explanatory.

By default, the installer will give you the option to install Ubuntu side by side with whatever operating system is currently on your computer. You can choose that if you want to set up a dual-boot, but as I stated before, the safest dual-boot is probably with Wubi, unless you know what you're doing (in which case you shouldn't be looking at this guide).

For simplicity's sake, you should select Use the entire disk. Or, if you don't want to erase your entire drive, click Quit and then boot back into Windows and set up a dual-boot using Wubi.

The next screen will ask you for your username and password. On some smaller screens, you may have to scroll down to see some of the other options.
Once you're sure you want to do this (this will erase your entire hard drive—make sure everything is backed up first!), click Install.

If you booted Try Ubuntu, you can still keep using the live CD to play games or surf the web while Ubuntu is installing. There is also a slideshow you can watch.

More slideshow.

Still more slideshow.

Yeah.

That's right.

Eventually, the installation will finish (the whole thing can take anywhere between 15 minutes and an hour, depending on the speed of your computer). You can either Continue Testing if you want to shutdown your computer or Restart Now if you want to restart your computer.

Either way, Ubuntu will eject your CD (or prompt you for when to remove your USB stick, if you used UNetBootIn instead of a CD burning program). The next time you boot up, you should have a working Ubuntu installation!

Desktop phishing

TH3 Professional Security

TH3-pro.blogspot.com


By Mr Raghib Amine


PHISHING : DESKTOP PHISHING
Summary

1- Disclaimer

2 - Phishing ?

3-What is desktop phishing ?

4- How it's work ?

5- What is Hostfile in windows ?

6-Example

7 -How can this attack can be allocatable ?

8- Credit

Disclamer


What is THe Professional security or TH3-pro.blogspot.Com?

TH3-pro.blogspot.Com is definitely not a site that promotes or encourages computer hacking (unethical), but rather it is a Computer Security related website. In fact, Computer Hacking and Computer Security are the two concepts that goes hand-in-hand. They are like the two faces of the same coin. So with the existence of close proximity between Hacking and Security, it is more likely that people often mistake our site to be one that promotes Hacking. But in reality, our goal is to prevent hacking. We believe that unless you know how to hack (ethically), you cannot defend yourself from malicious hack attacks. Know Hacking but No Hacking!

Your usage of this website constitutes your agreement to the following terms.
1. All the information provided on this site are for educational purposes only. The site is no way responsible for any misuse of the information.

2. “ TH3 professional security” is just a term that represents the name of the site and is not a site that provides any illegal information. TH3-pro.blogspot.Com is a site related to Computer Security and not a site that promotes hacking/cracking/software piracy.

3. This site is totally meant for providing information on “Computer Security” “Computer Programming” and other related topics and is no way related towards the terms “CRACKING” or “HACKING” (Unethical).

4. Few articles (posts) on this site may contain the information related to “Hacking Passwords” or “Hacking Email Accounts” (Or Similar terms). These are not the GUIDES of Hacking. They only provide information about the legal ways of retrieving the passwords. You shall not misuse the information to gain unauthorised access. However you may try out these hacks on your own computer at your own risk. Performing hack attempts (without permission) on computers that you do not own is illegal.

5. The virus creation section on this site provides demonstration on coding simple viruses using high level programming languages. These viruses are simple ones and cause no serious damage to the computer. However we strongly insist that these information shall only be used to expand programming knowledge and not for causing malicious attacks.

6. All the information on this site are meant for developing Hacker Defense attitude among the users and help preventing the hack attacks. Gohacking.Com insists that these information shall not be used for causing any kind of damage directly or indirectly. However you may try these codes on your own computer at your own risk.

7. The word “Hack” or “Hacking” that is used on this site shall be regarded as “Ethical Hack” or “Ethical Hacking” respectively.

8. We believe only in White Hat Hacking. On the other hand we condemn Black Hat Hacking.

8. Most of the information provided on this site are simple computer tricks (may be called by the name hacks) and are no way related to the term hacking.

9. Some of the tricks provided by us may no longer work due to fixture in the bugs that enabled the exploits. We are not responsible for any direct or indirect damage caused due to the usage of the hacks provided on this site.

10. The site holds no reponsiblity for the contents found in user comments and forum since we do not monitor them. However we may remove any sensitive information present in the user comments or on the forum upon request.

11. We reserve the right to modify the Disclaimer at any time without notice.
This documentation is joined with a video you can found it in youtube channel youtube/oxiiiiid or our tv
TH3.blip.tv
2 What Is Phishing ?

In the field of computer security, phishing is the criminally fraudulent process of attempting to acquire sensitive information such as usernames, passwords and credit card details by masquerading as a trustworthy entity in an electronic communication. Communications purporting to be from popular social web sites, auction sites, online payment processors or IT administrators are commonly used to lure the unsuspecting public. Phishing is typically carried out by e-mail or instant messaging,[1] and it often
directs users to enter details at a fake website whose look and feel are almost identical to the legitimate one. Even when using server authentication, it may require tremendous skill to detect that the website is fake. Phishing is an example of social engineering techniques used to fool users,[2] and exploits the poor usability of current web security technologies.[3] Attempts to deal with the growing number of reported phishing incidents include legislation, user training, public awareness, and technical security measures.
A phishing technique was described in detail in 1987, and the first recorded use of the term "phishing" was made in 1996. The term is a variant of fishing,[4] probably influenced by phreaking,[5][6] and alludes to baits used to "catch" financial information and passwords. Wikipidia


1) what is desktop phishing ?


Salamo Alaykoum . Desktop Phishing is one more method of Phishing useful to hack email account passwords. Not only email passwords, but you can hack any account password of site you want. Attacker has to send phisher to victim to his in box and you have to wait for victim to login with out sent Phisher.

But, in Desktop Phishing, you only have to send the Phisher Arm (If it's phisher in phishing, we call it phisher arm in Desktop Phishing). You have to run server on your computer and save fake page of the website you wanna hack password, in directory of this server.

2) how it's work ?


Like you see in diagram pic in desktop phishing the victim are not directly linked to the fake page but is redirected to the fake page by using something called hostfile in windows

3)What is Hostfile in windows ?


The hosts file is a computer file used in an operating system to map hostnames to IP addresses. This method is one of several system facilities to address network nodes on a computer network. On some operating systems, the host file content is used preferentially over other methods, such as the Domain Name System (DNS), but many systems implement name service switches to provide customization. Unlike DNS, the hosts file is under the control of the local computer's administrator (wiki)

the attacker with some way like we will see in this tutorial can change the host file by changing or adding a wrong Dns value DNS linked to a web site by an other related to the fake page

4)How ? (example)

take of Example that the Ip address of www.paypal.com is 88.55.266.4
and the attacker has a server with a fake page of paypal uploaded in and the ip address of server is 255.56.77.89 so the attacker will add

www.paypal.com 255.56.77.89

then the victim when he will put http://www.paypal.com the address bar normally the browser will look for the ip address of this by looking first in hostfile in windows will not redirect to 88.55.266.4 but it will redirect to the attacker server 255.56.77.89
more than that the address will not change I mean that www.paypal.com it will stay and it will not change also the victim will not pay attention that he is on a fake website or a page
From here you will understand the danger of hostfile in windows

5) How can this attack can be allocatable ?

Simply you can use a large script that can aplicate this attack for me or like you see in video I use a fake program that I prompte to user to click to see the webcam of camera by clicking the program will put some fake ip address related to some fake servers that I have

VB script Code:


Open "c:\windows\system32\drivers\etc\hosts" For Output As #1

Print #1, "127.0.0.1 localhost"

Print #1, "127.0.0.1 th3-pro.blogspot.com"

Close #1


TH3- END

Credit

TH3 professional security TM
copyright 2010©

Raghib Amine
BlOG : TH3-pro.blogspot.com
YOUTBE : Youtube.com/oxiiiiid
FACEBOOK:facebook.com/TH3.prof
TV: TH3.blip.TV


Download documentation from
http://www.ziddu.com/download/10481575/dekstopphishing.doc.html


see or video also in

from

http://blip.tv/file/3812654


Work In internet out from home

you looking to make some money you have some free time and you wanna profite of it to work out from your home ,odesk company can realise your dream and be true no more fake web sites no blabla watch out Episode to know more how it's work

maded by rahgib amine


link to video


link of odesk website


happy watching
:)


How to identify Open Ports in ubuntu with nmap

http://www.quantrimang.com.vn/download/data/Image/Khac/102009/1910_ubuntu-penguin_450.jpg
Nmap is a utility for network exploration or security auditing. It supports ping scanning (determine which hosts are up), many port scanning techniques, version detection (determine service protocols and application versions listening behind ports), and TCP/IP fingerprinting (remote host OS or device identification).
Nmap also offers flexible target and port specification, decoy/stealth scanning, sunRPC scanning, and more. Most Unix and Windows platforms are supported in both GUI and commandline modes. Several popular handheld devices are also supported, including the Sharp Zaurus and the iPAQ.
Install nmap in ubuntu
sudo apt-get install nmap
Nmap examples
Here are some Nmap usage examples, from the simple and routine to a little more complex and esoteric. Some actual IP addresses and domain names are used to make things more concrete. In their place you should substitute addresses/names from your own network.. While I don’t think port scanning other networks is or should be illegal, some network administrators don’t appreciate unsolicited scanning of their networks and may complain. Getting permission first is the best approach.
For testing purposes, you have permission to scan the host scanme.nmap.org. This permission only includes scanning via Nmap and not testing exploits or denial of service attacks. To conserve bandwidth, please do not initiate more than a dozen scans against that host per day. If this free scanning target service is abused, it will be taken down and Nmap will report Failed to resolve given hostname/IP: scanme.nmap.org. These permissions also apply to the hosts scanme2.nmap.org, scanme3.nmap.org, and so on, though those hosts do not currently exist.
nmap -v scanme.nmap.org
This option scans all reserved TCP ports on the machine scanme.nmap.org . The -v option enables verbose mode.
nmap -sS -O scanme.nmap.org/24
Launches a stealth SYN scan against each machine that is up out of the 256 IPs on “class C” sized network where Scanme resides. It also tries to determine what operating system is running on each host that is up and running. This requires root privileges because of the SYN scan and OS detection.
nmap -sV -p 22,53,110,143,4564 198.116.0-255.1-127
Launches host enumeration and a TCP scan at the first half of each of the 255 possible eight-bit subnets in the 198.116 class B address space. This tests whether the systems run SSH, DNS, POP3, or IMAP on their standard ports, or anything on port 4564. For any of these ports found open, version detection is used to determine what application is running.
nmap -v -iR 100000 -Pn -p 80
Asks Nmap to choose 100,000 hosts at random and scan them for web servers (port 80). Host enumeration is disabled with -Pn since first sending a couple probes to determine whether a host is up is wasteful when you are only probing one port on each target host anyway.

sniff paswords using wireshark

http://www.mixis.fr/images/wireshark.jpg

TH3 Professional security
TH3-pro.blogspot.com

by Mr Raghib Amine


sniffing : wireshark

About This Documentation
This documentation is joined with a video you can found it in youtube channel youtube/oxiiiiid or our tv
TH3.blip.tv


Phase 1 Download wireshark From


Or In debian

sudo apt-get install wireshark

Phase 2 Run wireshark

In Linux (debian)

sudo wireshark

In Windows double Click In wireshark icone

Phase 2 configure

just chose your interface (eth0) by double and click


phase 3 How To sniff

to start sniffing Http Protocol just type in filter (http) and white to someone connect on his/here account and you will see his/here passwords it may be can crypt ed so you need a md5 cracker to crack his/here password


TH3- END

E-mail : redhat@hotmail.fr


download the documontation
click here


See the video from youtube *


click here 

video in arabic language 


Znmap

http://nmap.org/zenmap/images/zenmap-multi-1220x700.png
Nmap and Zenmap (the graphical front end) are available in several versions and formats. Recent source releases and binary packages are described below. Older version (and sometimes newer test releases) are available from the dist directory (and really old ones are in dist-old). For the more security-paranoid (smart) users, GPG detached signatures and SHA-1 hashes for each release are available in the sigs directory (verification instructions). Before downloading, be sure to read the relevant sections for your platform from the Nmap Install Guide. The most important changes (features, bugfixes, etc) in each Nmap version are described in the Changelog. Using Nmap is covered in the Reference Guide, and don't forget to read the other available documentation, particularly the new book Nmap Network Scanning!

Grml

grml_2010.04.png
Grml is a bootable live system (Live-CD) based on Debian. Grml includes a collection of GNU/Linux software especially for system administrators and users of texttools. Grml provides automatic hardware detection. You can use Grml (for example) as a rescue system, for analyzing systems/networks or as a working environment. One of the main features of the grml system is the zsh (Z shell). The zsh is the default interactive shell of the grml system. The kernel 2.6 provided by the grml system is based on the latest stable(!) vanilla kernel (taken from kernel.org) we consider 'useful and working'. The grml-kernel includes several patches and modules. A little modified version of live Grml is Grml-Forensic.

Details

  • Discussion Forum  :


Fiddler

http://www.fiddler2.com/Fiddler/images/FiddlerLogo.png

What is Fiddler?

Fiddler is a Web Debugging Proxy which logs all HTTP(S) traffic between your computer and the Internet. Fiddler allows you to inspect all HTTP(S) traffic, set breakpoints, and "fiddle" with incoming or outgoing data. Fiddler includes a powerful event-based scripting subsystem, and can be extended using any .NET
language.
Fiddler is freeware and can debug traffic from virtually any application, including Internet Explorer, Mozilla Firefox, Opera, and thousands more.

cryptmount

crypt-img.png


cryptmount is a utility for GNU/Linux operating systems which allows an ordinary user to mount an encrypted filing system without requiring superuser privileges. It is aimed at recent Linux systems using the 2.6 kernel series. cryptmount was written to make it as easy for ordinary users to access encrypted filesystems on-demand using the newer devmapper mechansism as it was to use the older, now deprecated, cryptoloop methods. This offers the following advantages:

Details

  • Discussion Forum :
  • Mailing List :
  • Platforms : Linux
  • License : GNU GPL
  • Author : rwpenney
  • Contact Email : rwpenney@users.sourceforge.net


Padding Oracle Exploit Tool (POET)

poetsc01.png 


Padding Oracle Exploit Tool (POET) demonstrates a powerful side-channel attack known as the padding oracle attack. 


  • Discussion Forum  :
  • Mailing List  :
  • Platforms  : Windows, Linux, Mac OSX
  • License  : GNU GPL
  • Author  :
  • Contact Email  : info@netifera.com


ArpON


ArpON (Arp handler inspectiON) is a portable handler daemon that make Arp secure in order to avoid Arp Spoofing/Poisoning & co. This is possible using two kinds of anti Arp Poisoning tecniques, the first is based on SARPI or "Static Arp Inspection", the second on DARPI or "Dynamic Arp Inspection" approach. Keep in mind other common tools fighting ARP poisoning usually limit their activity only to point out the problem instead of blocking it, ArpON does it using SARPI and DARPI policies. Finally you can use ArpON to pentest some switched/hubbed LAN with/without DHCP protocol, in fact you can disable the daemon in order to use the tools to pson the ARP Cache. Features: - It replaces Arpwatch & co; ArpON blocks; - It detects and blocks Arp Poisoning/Spoofing attacks in statically configured networks; - It detects and blocks Arp Poisoning/Spoofing attacks in dinamically configured (DHCP) networks; - It detects and blocks unidirectional and bidirectional attacks; - It manages the network interface into unplug, boot, hibernation and suspension OS features; - Easily configurable via command line switches, provided that you have root permissions; - It works in userspace for OS portability reasons; - Tested against Ettercap, Cain & Abel, dsniff and other tools.
download

Download:All versions of AVG Anti-Virus and Internet Security keygen


This keygen includes many keygens for the latest AVG Softwares and abousolutely contains no spyware,virus,etc.I have already scanned it with the latest version of Avira and reported 0 threats !Here is a virustotal.com report only 3 out 39 antiviruses and it's a false positive
http://www.virustotal.com/analisis/69dc5c560787ed47800b4d998daf3b59

Also scanned with Avira,Norton and Adware Pro as well but if you think otherwise let me know

This pack contains the following keygens :

AVG Internet Security Network Edition
AVG Internet Security 3-pack
AVG Internet Security SBS
AVG Anti-Virus plus Firewall
AVG Email Server Edition
AVG File Server Edition
AVG Anti-Virus
AVG Free
AVG Anti-Virus SBS Edition


Download:AVG Keygen

Activate Windows 7 with Windows 7 Ultimate Keygen

Activate Windows 7 with Windows 7 Ultimate Keygen

Windows Seven is slowly becoming a bigger success thn Windows Vista .So here we have it now !

Click Generate and it will Generate and copy the serial to the clipboard for
you. All the keys have been put together from MS in a randomized
order.

The generated keys are working for 32 and 64bits and also on
Beta and RC builds.. Even the latest one, 7127

Download Windows 7 Ultimate Keygen

[TUT] Verify a Paypal in ANY Country!!!


I see a lot of People on the Forum asking "How can I Verify my UK Paypal? Not an American", so today I will answer those problems with this Simple Technique.

This will involve setting up an American Paypal though, but thats part of the Verification.

Step 1:

Visit this Thread and make a Verified Paypal Account: (No Credits go to me for this part of the Tut)

http://www.sythe.org/showthread.php?t=638933

Step 2:

Go to your Profile, then go to Currencies:

[Image: paypaltut.png]

Step 3:

Select GBP, then follow the Numbers 1,2,3,4,5 in order:

[Image: paypaltut2.png]

You now have a Verified UK Paypal Account!! Victoire

Hope you liked the TUT, please do not redistribute Oui

Tutorial On Getting Free .com/.net/.org.. Domain With Hosting


STEP 1:
We need to install mozilla firefox ... if u dont have it download it here:
http://www.mozilla.com/en-US/products/download.html

Then we need proxy, german proxy u can find some german proxys here:
http://www.xroxy.com/proxylist.php?port=...ity=#table
when u got a proxy test it here:
http://ip-adress.com
if it shows your location then the proxy wasnt valid if it http://www.mozilla.com/en-US/products/do....htmlshows a location on germany it is a valid proxy.


STEP 2:
Go here
Domain registrieren :: http://www.domain24.de/

Then type the domain you want and press suchen - Like in screen shoot!

[Image: 55183955.jpg]

STEP 3:
Then u get a list of the domain u choose, chek any domain u want but not the domain that says VERGEBEN, cause that means
that it is taken, and then press The button .... - Like in screen shoot!

[Image: 11523727.jpg]


Then click "Melden sie sich hier an" - Like in screen shoot!

[Image: 18152449.jpg]

STEP 5:
Then it asks for name, surname, adress,phone number .... type everything fake ... u can do it like in image but at the phone number type this
030- ( 7numbers what u want), and the email... type your gmail account! and press WEITER! - Like in screen shoot!

[Image: 43232390.jpg]

STEP 6:
Now you need to type a BLZ konto .. go here
http://bing.com and search for this :
"blz konto postbank germany 2009" without ""
When u find one it should look like this

[Image: 77693319.jpg]

Then type it in that format here and then press WEITER - Like in screen shoot!

[Image: 48151439.jpg]

STEP 7:
Now accept the TOS and press Anmelden! Now wait about 24h until the domain is active:D - Like in screen shoot!

[Image: 81519776.jpg]

STEP 8:
Login to your gmail account and chek your imbox for a message, if u got a message it should look like this! - Like in screen shoot.

[Image: 30478511.jpg]

If yes you got your account login details ! Login with your email and the password that they send to you.

STEP 9:
Now we are going to buy hosting :D if u see your domain there press WEBSPACE ...follow the image.
First do this

[Image: 99567336.jpg]

Then press DOMAINS like this


[Image: 83666680.jpg]

Then chek if it is activated .... if it shows you this,

Thread continued below(maximum Picture limit)

[Image: 99390962.jpg]

then your domain isnt activated yet wait 24h from the registration :D
but if it shows you this

[Image: 25806114.jpg]

then your domain is activated ... press then WEBSPACE ... like in that pic!

STEP 10:
Then u see some thing like this ...

[Image: 45666732.jpg]

Pres the last one ... the 5th press the button down!

Almost done :D lol

STEP 11:
After u did that u are going to recviev about 3 or 4 mails ... i can be after 1 hour .... dont know ... but you are going to recvieve something:D
Search for a mail named
Domain 24 - Webspace bestellung
that looks like this!

[Image: 64435254.jpg]

STEP 12:
http://www.ispcp.adminfrontend.de/
Default PLESK Page
And login:
The username should be the domain that u bought
The password is your account password that u got in the first mail:D

STEP 13:
Then when you are loged in press on the TOP menu press an icon that says:
"FTP zugange"
And then on the menu in the left side press:
"FTP-zugang anlegen" - Like in screen shoot!

[Image: 97825691.jpg]

LAST STEP - STEP 14:
Create your ftp account
First write the username you want ...
Then twice the password and press
"Anlegen"

[Image: 79092584.jpg]

Your username is going to be
username@yourdomain.com or .net ... or what u choosed:D

--
Congrats now wait about 6 hours, untill the FTP account is activated :D
Chek it with your FTP CLIENT every hour if it is avtivated, if it is activated you are going to see about 4 or 5 folders:D
Dont delete them, you should upload your files at the folder named
HTDOCS or something like this...
by Mr electroman 
TH3-pro.blogspot.com
تطوير : مدونة حكمات